


6
OPERATING PROCEDURES
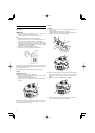
Fuel (Fig. 1)
WARNING
The hedge trimmer is equipped with a two- stroke engine.
Always run the engine on fuel, mixed with oil.
Provide good ventilation, when fueling or handling fuel.
Fuel
○ Always use branded 89 octane unleaded gasoline.
○ Use genuine two-cycle oil or use a mix between 25:1 to 50:1,
please consult the oil bottle for the ratio or Hitachi dealer.
○ If genuine oil is not available, use an anti-oxidant added quality
oil expressly labeled for air-cooled 2-cycle engine use (JASO
FC GRADE OIL or ISO EGC GRADE). Do not use BIA or TCW
(2-stroke water-cooling type) mixed oil.
○ Never use multi-grade oil (10W/30) or waste oil.
○ Always mix fuel and oil in a separate clean container.
Fig. 1
Always start by fi lling half the amount of fuel, which is to be used.
Then add the whole amount of oil. Mix (shake) the fuel mixture. Add
the remaining amount of fuel.
Mix (shake) the fuel-mix thoroughly before fi lling the fuel tank.
Fueling
WARNING (Fig. 2)
○ Always shut off the engine before refueling.
○ Slowly open the fuel tank (1), when fi lling up with fuel, so that
possible over-pressure disappears.
○ Tighten the fuel cap carefully, after fueling.
○ Always move the unit at least 3 m from the fueling area before
starting.
1
Fig. 2
Before fueling, clean the tank cap area carefully, to ensure that
no dirt falls into the tank. Make sure that the fuel is well mixed by
shaking the container, before fueling.
Starting
CAUTION
Before starting, make sure the cutting attachment does not
touch anything.
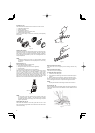
1. Set ignition switch (2) to ON position (A). (Fig. 3)
* Push priming bulb (4) several times so that fuel fl ows through
the bulb or return pipe. (If so equipped) (Fig. 4)
2
3
A
Fig. 3
4
Fig. 4
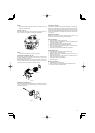
2. With the throttle trigger lockout (3) pressed, pull throttle trigger,
then slowly release throttle the trigger fi rst, then the throttle
trigger lockout. This will lock the throttle in starting position.
(Fig. 3)
3. Set choke lever (5) to CLOSED position (B). (Fig. 5)
5
B
C
Fig. 5
4. Pull recoil starter briskly, taking care to keep the handle in your
grasp and not allowing it to snap back. (Fig. 6)