


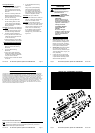

Page 8 For technical questions, please call 1-800-444-3353. SKU 67336
Part Description Qty
1 Blade cover 1
2 Sideburns xing blade 1
3 Sideburns moving blade 1
4 Pressure plate 1
5 Spring 1
6 Sideburns blade 1
7 Sideburns Blade holder 1
8 Oscillator 1
9 Cap 1
10 Blade base 1
11 Big blade tube 1
12 Nose Hair Blade holder 1
13 Small moving blade 1
14 Small xing blade 1
Part Description Qty
15 Nose Hair Blade Holder 1
16 Small blade tube 1
17 Swinging head 1
18 Blade holder core 1
19 Body back 1
20 Motor 1
21 Contact plate(+) 1
22 Cover plate 1
23 Battery Cover 1
24 Contact plate(-) 1
25 Body front 1
26 Switch plate 1
27 Switch 1
PARTS LIST & ASSEMBLY DIAGRAM
Page 7For technical questions, please call 1-800-444-3353.SKU 67336
PLEASE READ THE FOLLOWING CAREFULLY
THE MANUFACTURER AND/OR DISTRIBUTOR HAS PROVIDED THE PARTS LISTAND ASSEMBLY
DIAGRAM IN THIS MANUALAS AREFERENCETOOLONLY. NEITHERTHE MANUFACTURER OR
DISTRIBUTOR MAKESANY REPRESENTATION OR WARRANTY OFANY KINDTOTHE BUYER THAT
HE OR SHE IS QUALIFIED TO MAKEANY REPAIRS TOTHE PRODUCT, OR THAT HE OR SHE IS
QUALIFIED TO REPLACEANY PARTS OF THE PRODUCT. IN FACT, THE MANUFACTURER AND/
OR DISTRIBUTOR EXPRESSLY STATES THATALLREPAIRSAND PARTS REPLACEMENTS SHOULD
BE UNDERTAKEN BY CERTIFIEDAND LICENSEDTECHNICIANS,AND NOTBY THE BUYER. THE
BUYERASSUMESALLRISKAND LIABILITY ARISING OUT OF HIS OR HER REPAIRS TOTHE
ORIGINAL PRODUCTOR REPLACEMENT PARTS THERETO, OR ARISING OUT OF HIS OR HER
INSTALLATION OF REPLACEMENT PARTS THERETO.
Record Product’s Serial Number Here:
Note: If product has no serial number, record month and year of purchase instead.
Note: Some parts are listed and shown for illustration purposes only, and are not
available individually as replacement parts.
Page 6 For technical questions, please call 1-800-444-3353. SKU 67336
MAINTENANCE AND
SERVICING
Procedures not specically
explained in this manual
must be performed only by a
qualied technician.
TO PREVENT
SERIOUS INJURY
FROM ACCIDENTAL
OPERATION:
Slide the Switch to the off
position (toward the Battery
Cover) before performing any
inspection, maintenance, or
cleaning procedures.
TO PREVENT SERIOUS
INJURYFROM TOOL
FAILURE:
Do not use damaged
equipment. If abnormal noise
or vibration occurs, have the
problem corrected before
further use.
Cleaning and Maintenance
BEFORE EACH USE,1. inspect the
general condition of the tool. Check
for loose hardware, misalignment or
binding of moving parts, cracked or
broken parts and any other condition
that may affect its safe operation.
AFTER USE,2. wipe external surfaces
with a clean cloth. Remove and
clean the Trimming Attachment (See
Trimming Attachments - Page 5). Let
air dry completely.
If storing the tool for a long period 3.
of time, remove the battery. Dispose
of spent batteries according to local,
state and federal regulations.
Page 5For technical questions, please call 1-800-444-3353.SKU 67336
Trimming Attachments
This unit comes with two Trimming
Attachments: a narrow tool for
trimming nose hairs and ear hairs,
and a wide attachment for trimming
sideburns.
To remove a Trimming Attachment:1.
Rotate the Trimming Attachment
counter clockwise, then pull it off the
top of the Trimmer Body.
To clean a Trimming Attachment:2.
Use the Cleaning Brush, or clean
in warm water and mild detergent.
Air dry the Attachment completely if
cleaning with water.
CAUTION: The Trimmer is not waterproof
and is not intended to be submerged
or rinsed, with the exception of the
removable Trimming Attachments.
To install a Trimming Attachment:3.
Line up the tabs on the inside of the a.
Attachment with the Alignment Slot
on the Trimmer Body.
Slide the Attachment onto the Body b.
and rotate clockwise to lock in place.
General Operating Instructions
Turn the Trimmer on by sliding the 1.
Switch (27) toward the Trimming
Attachment.
To use the Nose Trimming 2.
Attachment:
Using a mirror (sold separately), a.
slowly and carefully insert the tip of
the Nose Hair Trimming Attachment
into your nostril or ear hole.
Slowly move the Trimmer as needed b.
to trim hair.
To use the Sideburns Trimming 3.
Attachment:
Using a mirror (sold separately),
press the trimmer gently against
your face where you want to trim
your sideburn, then slowly slide it
down the side of your face, trimming
excess hair. Repeat as needed.
CAUTION: Use only on facial hair.
To prevent accidents, turn off the tool 4.
after use. Clean, then store the tool
indoors out of children’s reach.
CAUTION: Do not insert the Trimmer
further into your nostril or ear than the
narrow tip on the outer blade. Do not
press the Trimmer forcefully into your
nostril or ear. For facial hair only.
Do not attempt to use the Trimmer
if any part of the blade appears
damaged. Injury to the nostril or ear
might occur.