


-3-
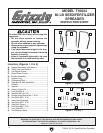
T10044 80 lb. Seed/Fertilizer Spreader
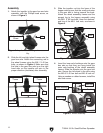
5. Insert the hairpin cotter pin into the shaft
located inside the bottom of the hopper.
6. Attach the handle assembly to the support
leg using the M6-1 X 40 hex bolts and the
remaining M6-1 lock nuts.
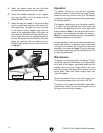
7. Insert the steel wire head of the control cable
into the small hole located at the end of the
lever assembly. To make sure that the holes
in the bottom of the hopper align with the
holes in the adjustable plate; fully push the
lever down and check the inside of the hop-
per to make sure that the adjustable plate is
closed. Clamp the control cable into the press
plates by removing and re-installing the two
Phillips head screws and lock nuts, as shown
in Figure 7.
Operation
The Model T10044 can be used for spreading
fertilizers or seed. If the product has large clumps,
place the catch tray on the inner lip of the hopper
to separate out particles that could clog the impel
-
ler during operation.
The impeller should move in a clockwise rotation.
If it does not, disassemble and make sure that
the hole in the gearbox axle is on the right hand
side as stated in Step 2, and the protrusion on the
gearbox is facing towards the back as stated in
Step 3. To evenly distribute product, the spreader
should be walked at a brisk pace.
During operation, push the handle downwards to
lessen the amount of product being distributed
and pull up to increase. The wing nut on the lever
assembly, as shown in Figure 7, can be adjusted
to facilitate a maximum product distribution for the
current spreading task.
Maintenance
To prevent unnecessary wear, the Model T10044
should be regularly maintained. Thoroughly clean
the inside of the hopper, adjustable plate and the
impeller after every use. Product that is left over
and not removed can impede the impeller during
future uses. Clean with warm soapy water and
rinse thoroughly.
Check the pressure level of the tires before use.
The maximum pressure for the tires is 24 PSI.
The gears in the gear box assembly were lubri
-
cated at the factory. Do not open the gear box or
dirt may enter and clog the gears.
Figure 7. Control lever assembly.
Press Plate
Steel Wire
Wing Nut