GB - 22
2. Pull idler (item 3) towards the outside of
the unit and remove PTO belt (item 1)
from idler (item 3).
3. Remove PTO belt (item 1) from mower
deck pulley and engine sheave (item 4).
Install (Figure 23)
1. Install PTO belt (item 1) on engine
sheave (item 4) and mower deck pulley.
2. Pull idler (item 3) towards the outside of
the unit and place PTO belt (item 1) on
idler (item 3).
3. Slowly release idler (item 3) until PTO belt
(item 1) rests firmly against idler (item 3).
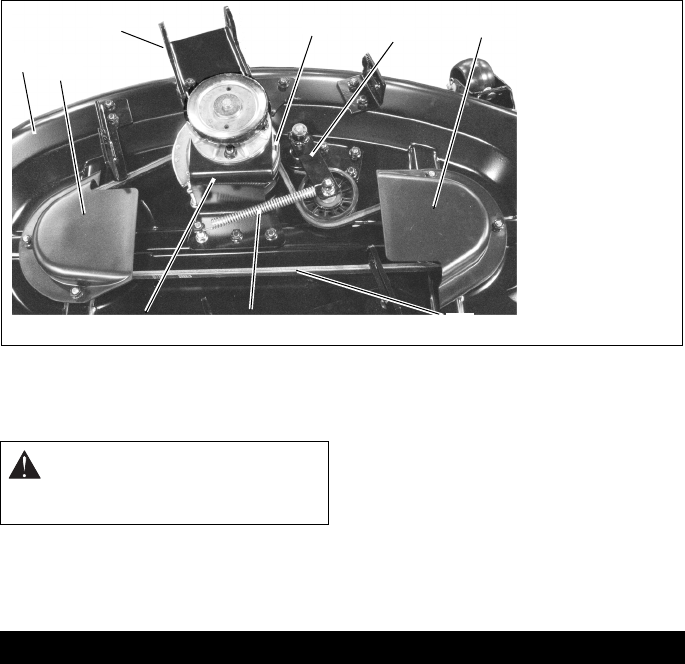
MOWER BELT REPLACEMENT (927064)
Remove (Figure 24)
1. Remove mower deck (see Remove and
Install Mower Deck on page 14).
2. Remove two belt covers (item 2).
3. Remove idler spring (item 9).
4. Remove front bracket (item 4) and clutch
bracket (item 10).
5. Remove mower belt (item 8).
Install (Figure 24)
1. Install mower belt (item 8) on right pulley
(item 3), idler (item 6), clutch (item 5), and
left pulley (item 7).
2. Install clutch bracket (item 10) and front
bracket (item 4).
3. Install idler spring (item 9).
4. Install two belt covers (item 2).
5. Install mower deck (see Remove and
Install Mower Deck on page 14).
Short Term Storage
IMPORTANT: NEVER clean unit with high-
pressure water or store unit outdoors.
Remove all dirt, grease, leaves, etc. Store in a
clean dry area.
Inspect unit for signs of wear or damage.
Ensure all fasteners are properly tightened.
Long Term Storage
Follow all instructions under Short Term
Storage.
Remove and fully charge battery. Store in a
clean dry area.
Drain fuel from fuel tank.
Refer to Engine Manual for the proper engine
storage procedures.
Touch up all scratched or chipped paint
surfaces.
OA0070
4
6
8
2, 3
2, 7
9
5
10
1
Figure 24
1. Mower Deck
2. Belt Cover
3. Right Pulley
4. Front Bracket
5. Clutch
6. Idler
7. Left Pulley
8. Mower Belt
9. Idler Spring
10. Clutch Bracket
CAUTION: Use care when releasing
idler spring tension. Keep body parts
well away from idler when performing
this operation.
STORAGE
