


9
131-6-98 IS2418
10 11 12
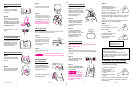
Using the Tray
Step 1.
Unlatch the tray by squeezing
the two latches under the tray
at the same time, and lift up.
Be careful not to let the tray
hit your baby when lifting or
closing the tray.
Step 2.
To latch tray, push it down
firmly.
NOTE: If tray does not latch, check back brace to be sure
the word REAR is away from the seat.
Step 3.
Push the elastic loop through
the hole on one side of seat.
Step 4.
Fold cover around bottom of
seat. Then fasten the hook into
the elastic loop on one side as
shown. Repeat on other side.
CAUTION: Be sure the seat
cover at armrest does not
interfere with tray latching.
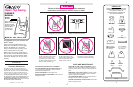
Attaching the Seat Belt
Reclining Back
Four Positions
Pull adjustment wire upward
and pull seat backward to
recline seat. Extra pressure is
required to go from the third
position to full recline.
For upright position, simply lift
back of seat forward.
Tray must be latched at all times when
baby is in swing. Pull up on tray to be sure it is latched.
Step 4.
To start swing, push the
desired speed button and give
the swing a gentle push.
Push 1 for the lowest ride.
Push 2 for medium ride.
Push 3 for the highest ride.
Step 5.
To turn swing off:
On models without music, push
the OFF button.
OR
On models with music, push
the active speed button.
Indicator light will go off and
swing will stop.
Indicator Light-
Red light comes on
when swing is turned on.
Attaching the Seat Cover
Step 1.
With baby out of swing, open
the battery compartment lid by
inserting a coin (penny, nickel
or dime) into the coin slot. After
the lid pops open, swing it
down and remove it.
Step 2.
Insert four D cells. CHECK
that the batteries are put in
correctly. Your swing will not
run if the batteries are put in
backwards.
Step 3.
To replace lid, put the two
tabs of the lid into the two
slots in the bottom of the motor
housing. Swing lid up, and
press it into place until you
hear the latch click.
Coin
slot
Installing the Batteries
To Use Head Supports
(on certain models)
Back of cloth seat pad
To provide head support for a
smaller child, insert the two
head support pads into the
pockets located in the back
of the cloth seat pad.
Step 1.
Thread one end of the seat
belt through the belt retainer
as shown.
Step 2.
Thread both ends of seat belt
through the buckles as shown.
CHECK that the belt is threaded
correctly by pulling on the seat
belt. The belt should not slip
through the buckle.
To release, push in on front of
buckle.
Step 1.
Slide the pocket of the seat
cover over the top of the seat
as shown.
Step 2.
Pull the crotch strap and both
ends of the seat belt through
the slots in the seat cover.
Starting the Swing
Step 2.
Fasten the seat belt. Adjust
belt as needed to get a snug
fit around your child.
Step 3.
Close the tray. CHECK that
the tray is latched by pulling
up on the tray.
Do not
depend on the tray or seat
belt alone to hold your baby.
Always secure your baby
with both the seat belt and
tray when your child is in
the swing.
CHECK that all parts are securely fastened together
before using the swing.
Step 1.
Open tray and seat belt. Place baby in the seat. (If your
child is very small, you may want to use rolled-up blankets
as a prop.)
NOTE: SEAT MAY BE STOPPED ANY TIME MOTOR
IS RUNNING WITHOUT DAMAGING MOTOR.
PUSH SWING TO RESTART.
IF YOUR SWING MOTOR STOPS OPERATING
BY ITSELF, PROTECTIVE DEVICE MAY HAVE BEEN
ACTIVATED. TURN OFF MOTOR, WAIT 3 MINUTES,
THEN RESTART SWING.
To Use Music (on certain models)
If you want music for your baby, push the music button
until desired volume is reached:
Push once for high volume.
Push a second time for
medium volume.
Push a third time for low
volume.
Push a fourth time to turn
music off.
NOTE: The music control is independent of the speed
setting. You can have any combination of speed and
music settings.
Observe the swinging motion for a minute. It takes time
for the swing to adjust to a setting. Change setting as
needed.
NOTE: A small, quiet baby will swing higher on each
setting than a larger, more active baby.