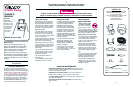
5
169-8-99 IS1600
678
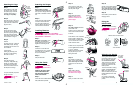
Attaching the Legs
Step 1.
Push oval end of the upper
leg sections firmly onto the
four plastic pegs. Hold tube
vertically while pushing in.
Push leg on completely.
Step 2.
Push the leg tips on the round
ends of the lower leg sections.
(The other end of each lower
leg has a wire.)
Step 3.
Put the wire end of lower
leg sections into the round
end of the upper leg sections.
Push the sections together
while twisting lower leg slightly.
This will ensure a snug fit.
Step 4.
CHECK:
Lift swing as shown. If legs are
assembled properly, the legs
will dangle from the motor unit
and not fall off.
IF LEG FALLS:
Holding leg vertically, push
leg firmly up while pushing
the motor unit down.
Step 5.
Open the swing legs
completely. Snap plastic leg
braces onto outside of legs.
The plastic pins inside the
ends of the braces will fit into
the dimples on the legs.
It may be necessary to spread
the legs as shown.
Do not use
swing without the leg
braces.
Wire end
Dimple
Hold
tube
vertically
Flattened
side
Plastic
peg
Attaching the Hanger
Step 1.
With crossbar of hanger
toward front of the motor unit,
line up holes in hanger brackets
with holes on the sides of motor
unit.
Step 2.
Insert screws into both brackets
as shown. Fasten with acorn
nuts using the enclosed hex
wrench. Tighten nuts firmly with
hex wrench and screwdriver.
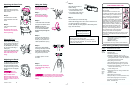
Adjusting the Handle
To bring infant carrier handle
from resting position into posi-
tion for carrying or swinging,
first set the carrier down.
Then push down on center of
handle, and pull the handle
forward until it clicks into the
locked position.
To return the handle to resting
position, first set the carrier
down. Then push down on
center of handle, and push the
handle backward until it clicks
into place.
It is normal for the handle
to seem loose in the resting
position.
Push down
on center
of handle
Push down
on center
of handle
Hanger
Notch
Step 2.
Lift top frame of cradle, and
turn handle so that it lines up
with the plastic hinges.
Step 3.
Snap handle and hinges
together to lock. Be sure
handle is locked into the
plastic hinges.
Step 4.
On certain models, attach the
outer cradle cover:
!
Place cover over cradle. Wrap
cover around outside of cradle
as shown.
!
Pull sides of cover completely
around cradle so elastic goes
around bottom of cradle. Fasten
VELCRO
®
tabs at end of cover
under cradle as shown.
!
Fasten VELCRO
®
strips at side
of cover under the fold bracket.
If
VELCRO
®
strips are
fastened over the fold bracket,
they will prevent you from
folding the cradle.
Step 5.
Put mattress, covered with
sheet, into the cradle. Push it
down all the way into cradle,
making sure it is secure and
level.
Step 6.
Place cradle in hanger.
Be sure handle notches
are seated in the hanger.
Step 7.
Place your child in the cradle.
Step 1.
With baby out of swing, open
the battery compartment by
gently pressing on the lid at the
ridged area and lifting the lid.
Step 2.
Insert four D cells. Be sure
the batteries are put in correctly.
(Swing will not run if batteries
are put in backwards.)
Step 3.
Snap the lid closed.
Using the Cradle
Not intended
for use as a night-time bed or
car bed.
REMOVE LAW TAGS FROM
CRADLE MATTRESS AND
QUILTED SHEET BEFORE
USING THIS CRADLE.
Step 1.
Cover soft side of cradle mattress
with quilted sheet provided.
Installing Batteries
NEVER INSERT OR REMOVE
BATTERIES WITH BABY IN THE SEAT. THEY COULD
FALL ON BABY IF DROPPED!
Round
end
(not oval)
Push
Push
Different uses for infant carrier...
Cuddler Carrier Feeder
...or as a Rocker.
Step 8.
Set the control switch between
the low and medium positions.
Your cradle will swing prop-
erly only in the lower range.
Step 9.
Give cradle a push to start the
swinging motion.
Using the
Infant Carrier
Lift carrier in and out of swing.
Do not adjust
the handle while carrier is
on swing.
Fasten
VELCRO
®
here