


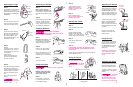


Attaching the Legs
Step 1.
Push oval end of the upper leg
sections firmly onto the four
plastic pegs. Hold tube vertically
while pushing in. Push leg on
completely.
Step 2.
Push the leg tips on the round
ends of the lower leg sections.
(The other ends have a wire.)
Step 3.
Put the wire end of lower leg
sections into the round end of
the upper leg sections. Push
the sections together while
twisting lower leg slightly. This
will ensure a snug fit.
Step 4.
CHECK:
Lift swing as shown. If legs are
assembled properly, the legs
will dangle from the motor unit
and not fall off.
IF LEG FALLS:
Holding leg vertically, push
leg firmly up while pushing
the motor unit down.
Step 5.
Open the swing legs completely.
Snap plastic leg braces onto
outside of legs. The plastic pins
inside the ends of the braces
will fit into the dimples on the
legs.
Pull on the leg brace tab to
take off.
Do not use
swing without the leg braces.
8
Wire end
Round
end
(not oval)
675
165-11-95 IS1554
Dimple
Hold tube
vertically
Flattened
side
Plastic peg
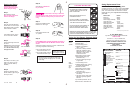
Attaching the Hanger
Step 1.
With crossbar of hanger
toward front of the motor unit,
line up holes in hanger brackets
with holes on the sides of motor
unit.
Step 2.
Insert screws into both brackets
as shown. Fasten with acorn
nuts using the enclosed hex
wrench. Tighten nuts firmly with
hex wrench and screwdriver.
Adjusting the Handle
To bring carrier handle from
resting position into position for
carrying or swinging, first set
the carrier down. Then push
down on center of handle, and
rotate the handle forward until it
clicks into the locked position.
To return the handle to resting
position, first set the carrier
down. Then push down on
center of handle, and rotate the
handle backward until it clicks
into place.
NOTE: It is normal for the
handle to seem loose in the
resting position.
Push down
on center
of handle
Push down
on center
of handle
Different uses for infant carrier...
Cuddler
Carrier Feeder
...or as a Rocker.
Using the Carrier
Lift carrier in and out of swing.
Do not adjust
the handle while carrier is on
swing.
Step1.
With baby out of swing, open
the battery compartment by
gently pressing on the lid at the
ridged area and lifting the lid.
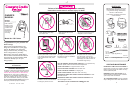
Installing Batteries
NEVER INSERT OR REMOVE
BATTERIES WITH BABY IN THE SEAT. THEY COULD
FALL ON BABY IF DROPPED!
Step 2.
Insert two D cells. Alkaline
or Ni-Cad D cells are best.
Be sure the batteries are put in
correctly. (Swing will not run if
batteries are put in backwards.)
Step 3.
Snap the lid closed.
Hanger
Notch
Step 2.
Snap handle and hinges
together to lock. Be sure
handle is locked into the
plastic hinges.
Step 3.
Place cradle in hanger.
Be sure handle notches are
seated in the hanger.
Starting the Cradle
Step 1.
Place your child in the cradle.
Step 2.
Set the CONTROL switch
between the low and center
positions. Your cradle will swing
properly only in the lower range.
Step 3.
Push ON/OFF switch to the
on position.
Step 4.
PUSH CRADLE TO START. BE SURE YOU PUSH
IT UP HIGH ENOUGH FOR THE MOTOR TO GET A
GOOD START.
NOTE: Draping a small blanket over side of cradle will
slow the swinging motion.
Using the Tray
Unlatch the tray by squeezing
the two latches under the tray
at the same time, and lift up
tray. Be careful not to let tray
hit your baby when lifting or
closing tray.
To latch tray, push down firmly.
Tray must be latched at all
times when baby is in the
swing.
Adjusting the Stand
To change recline of the carrier,
squeeze the adjustment wire
and move to desired position.
To adjust for rocking, move the
adjustment wire to the highest
position.
Do not change
recline with baby in carrier.
Be aware that infant move-
ment or rocking may cause
the carrier to move on a table.
Using the Cradle
REMOVE LAW TAGS FROM
THE CRADLE PAD BEFORE
USING THIS CRADLE.
Step 1.
Lift top frame of cradle, and
turn handle so that it lines up
with the plastic hinges.
Not intended for use as a night-time
bed or car bed.