


5
135-1-99 IS2131
Attaching the Seat
Step 1.
Slide hanger tubes into both
armrests of seat.
If your model has side-facing
metal buttons instead of for-
ward-facing buttons at top of
hanger tubes, the side-facing
buttons must face toward the
seat as shown.
Line up holes in both armrests
with holes in the hanger tubes.
Put a screw through the holes,
with head of screw on inside
of the seat. Fasten screws with
an acorn nut, and tighten
securely with enclosed wrench.
The seat back
must overlap armrests, as
shown enlarged at right.
Step 2.
With seat facing front of swing,
push ends of both hanger tubes
into the brackets as shown.
When the metal buttons pop out
into the bracket holes, the tubes
are locked.
CHECK that the hanger tubes
are secure in brackets by
pulling firmly on them.
To remove hanger tubes from
brackets, push metal buttons in
and pull hanger tubes out.
Step 3.
Slide the seat wire through the
seat back loops.
Step 4.
Insert the end of the seat wire
through the hanger tubes as
shown. Then screw plastic nuts
on both ends of the seat wire
and tighten securely with the
enclosed wrench.
Do not use
swing if the seat wire is not
securely attached. If seat can
recline backwards between
the hanger tubes, check the
wire assembly.
6 8
Step 3.
From the inside of the seat,
press the two plastic fasteners
through the holes in the vinyl
cover into the holes in the
plastic seat.
If holes in vinyl are not fully
open, push fasteners through
vinyl with enough force to open
the holes.
Step 4.
Fold cover around bottom of
seat.
Cloth Seat Cover
(on certain models):
(No plastic fasteners are
included with cloth seat cover
models.)
Step 1.
Slide the pocket of the cloth
cover over the top of the seat
as shown.
Step 2.
Push both ends of the seat belt
through the slots in the cloth
cover, and pull the belt through.
Step 3.
Push the plastic clip under
one side of the seat as shown.
Repeat on other side.
Step 4.
Pull the fabric out at the leg
openings.
Step 1.
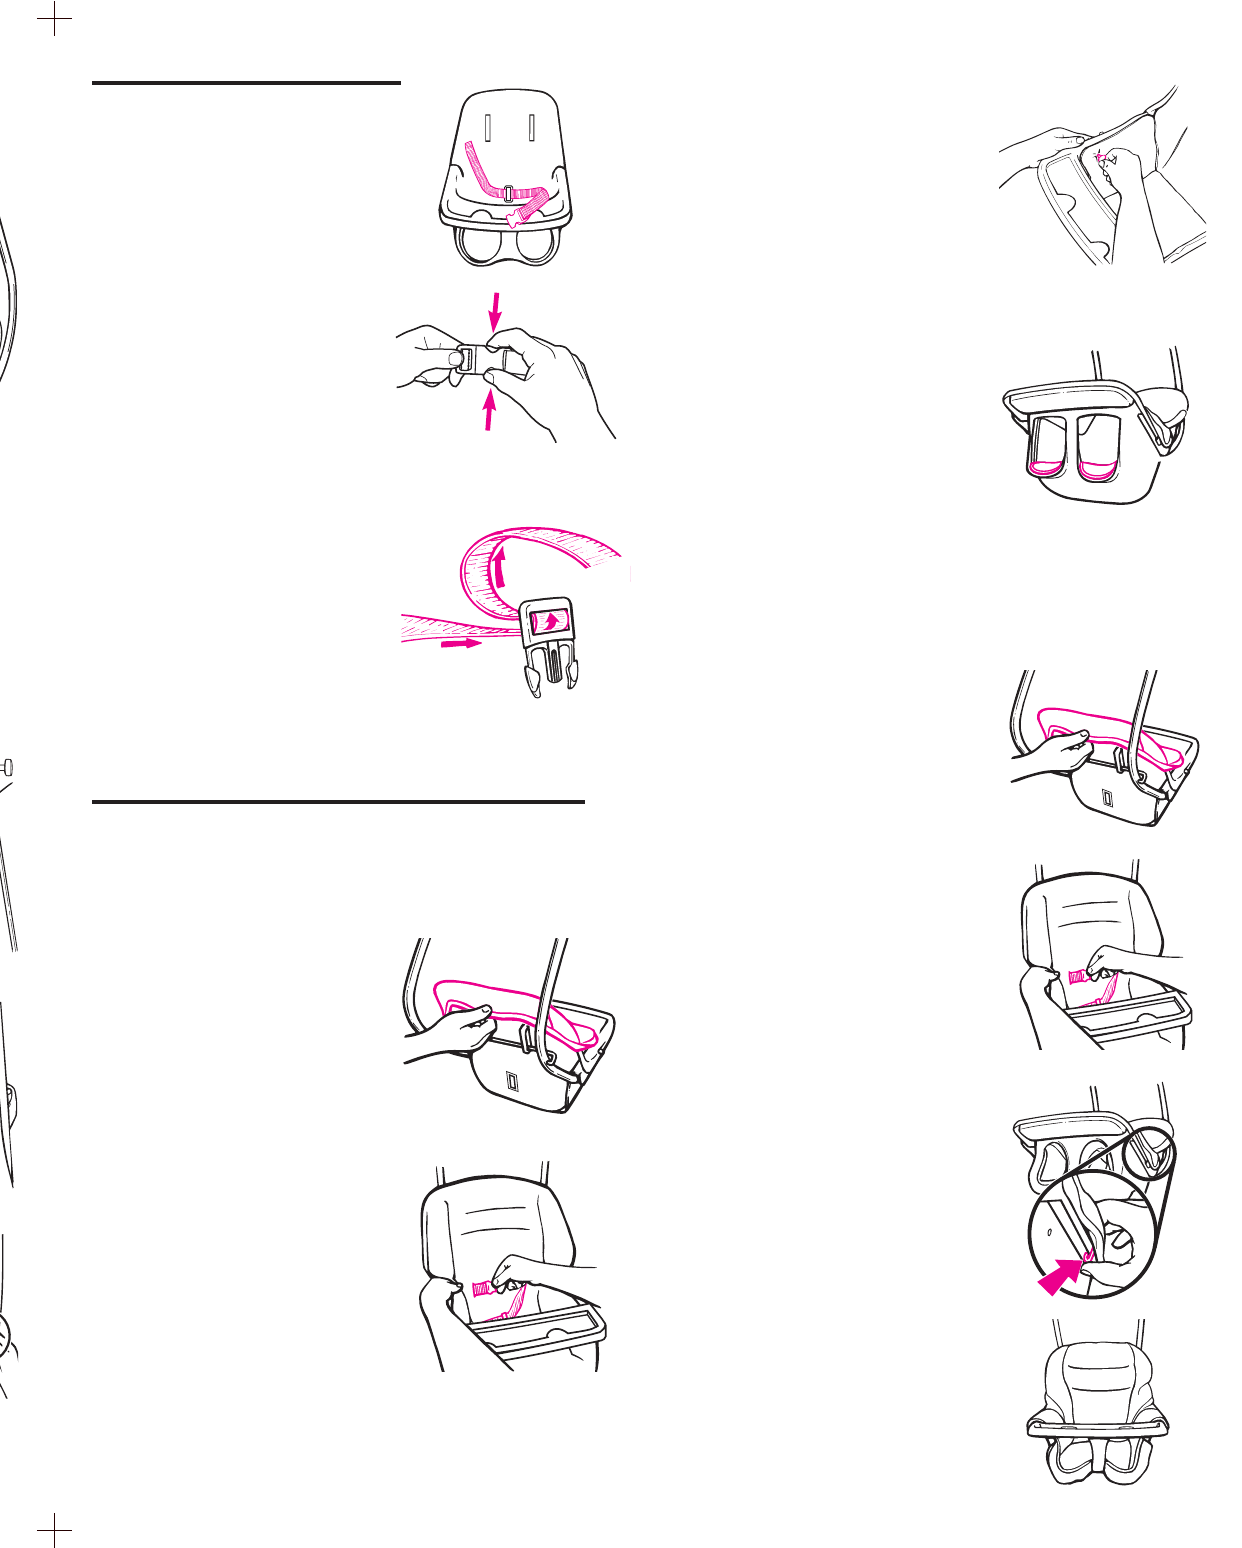
Thread the free end of the seat
belt through the belt retainer as
shown.
Step 2.
Open buckle by squeezing
sides of buckle to release.
Step 3.
Thread belt through the buckle
as shown. CHECK to make
sure that the belt is threaded
correctly by pulling on the seat
belt. The belt should not slip
through the buckle.
Vinyl Seat Cover
(on certain models):
Step 1.
Slide pocket at top of vinyl
seat cover over the seat back.
Step 2.
Push both ends of the seat
belt through the slots in the vinyl
cover, and pull the belt through.
If slots in vinyl are not fully
open, push ends of buckle
through vinyl with enough force
to open the slots.
7
Attaching the Seat Belt
Attaching the Seat Cover—2 Options
Your swing will have EITHER a vinyl or cloth seat cover.
Follow the appropriate instructions below.
Acorn nut
on outside
of seat
Side-facing
metal buttons
face toward
seat
Push
Push
Dimple
Attaching the Legs
Step 1.
Lower leg sections have a wire in one end. Push a
plastic end cap onto opposite end, without the wire, as
shown. Repeat for the other three lower leg sections.
Step 2.
With a slight twisting motion, push wire end of a lower
leg into completely open end of upper leg (other end
is knob-shaped). Repeat for other three lower legs.
Step 3.
Push knob shaped end of a
leg assembly onto plastic peg
inside end of motor housing as
shown. Push down until leg
snaps in place. Repeat for
other three legs.
CHECK that all legs are
securely attached to the
motor housing by pulling
firmly on them.
Step 4.
Open the swing legs
completely. If necessary, turn
legs to line up the dimples on
the legs with the plastic leg
braces. Snap leg braces onto
outside of legs. The plastic
pegs inside the ends of the
braces will fit into the dimples
on the legs.
It may be necessary to spread
the legs as shown.
Do not use
the swing without the leg
braces.
To close legs for storage, first
unsnap leg braces. Then pull
the tabs under the motor
outward as shown, and move
the legs inward.
To remove legs completely,
first move legs inward, then
pull out with a twisting motion.
Pull
tabs
Move legs
End cap
No wire
Lower leg
Wire
Lower leg
Upper leg
Wire
Knob
Knob
PUSH
Peg
SNAP
Dimple