


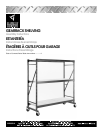


4
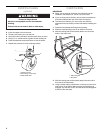
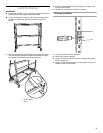
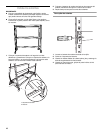
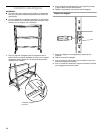
Install the Casters
(optional)
1. Lay the welded end frames down.
2. Insert the caster bolt into the hole.
3. Thread a self-locking nut onto the bolt
4. Using the wrench provided, hold the caster firmly in place.
5. Using a ³⁄₄ in. socket wrench, tighten the self-locking nut.
6. Press the attached metal brake lever to lock the wheel.
7. Repeat this process for the 3 remaining casters.
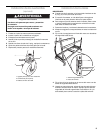
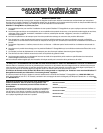
Install the Rails
IMPORTANT:
■
When you are using all 3 shelves, the first shelf must be
installed in the bottom 6 in. (15.24 cm) of the frame.
■
If you are using only 2 shelves, one rail must be attached to
the bottom holes at the rear of the frame for support.
■
To ensure level shelves, you must count and mark the
placement holes accurately on each side before installing the
rails.
1. Determine the desired shelf height and spacing.
2. Mark the corresponding holes on all sides of the frame.
3. With the locking tabs to the outside, attach one rail to the
holes in the frame front.
4. With the locking tabs to the outside, attach the other rail to
theholesintheframeback.
5. Using a rubber mallet, pound down on the top of each rail to
seat it firmly in the frame. Make sure the rail locking tab is
engaged. You will hear a click, and the tab will be flat against
thefaceoftheendplate.
1. Caster bolt hole
2. Self-locking nut (on bolt)
3. Metal brake lever
WARNING
Excessive Weight Hazard
Use two or more people to move and assemble
shelving.
Failure to do so can result in back or other injury.
1
2
3
1. Rail locking tab
2. End plate
1
2