


15
15
To clean or replace foam pre-cleaner:
Remove air cleaner cover, then foam pre-filter.
Wash pre-cleaner in soapy water. Squeeze pre-filter dry in clean
cloth (DO NOT TWIST).
Clean air cleaner cover before re-installing it.
To clean or replace paper air filter:
Remove air cleaner cover; then remove foam pre-filter (service if
necessary) and remove paper filter.
Clean paper filter by tapping it gently on a solid surface. If the
filter is too dirty, replace it with a new one. Dispose of the old filter
properly.
Clean air cleaner cover then slip pre-cleaner over filter. Next insert
new paper filter into the base of the air cleaner. Re-install air
cleaner cover.
NOTE:
To order a new air filter, please contact the nearest authorized
service center at 1-800-333-1322.
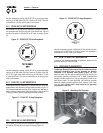
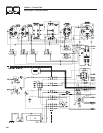
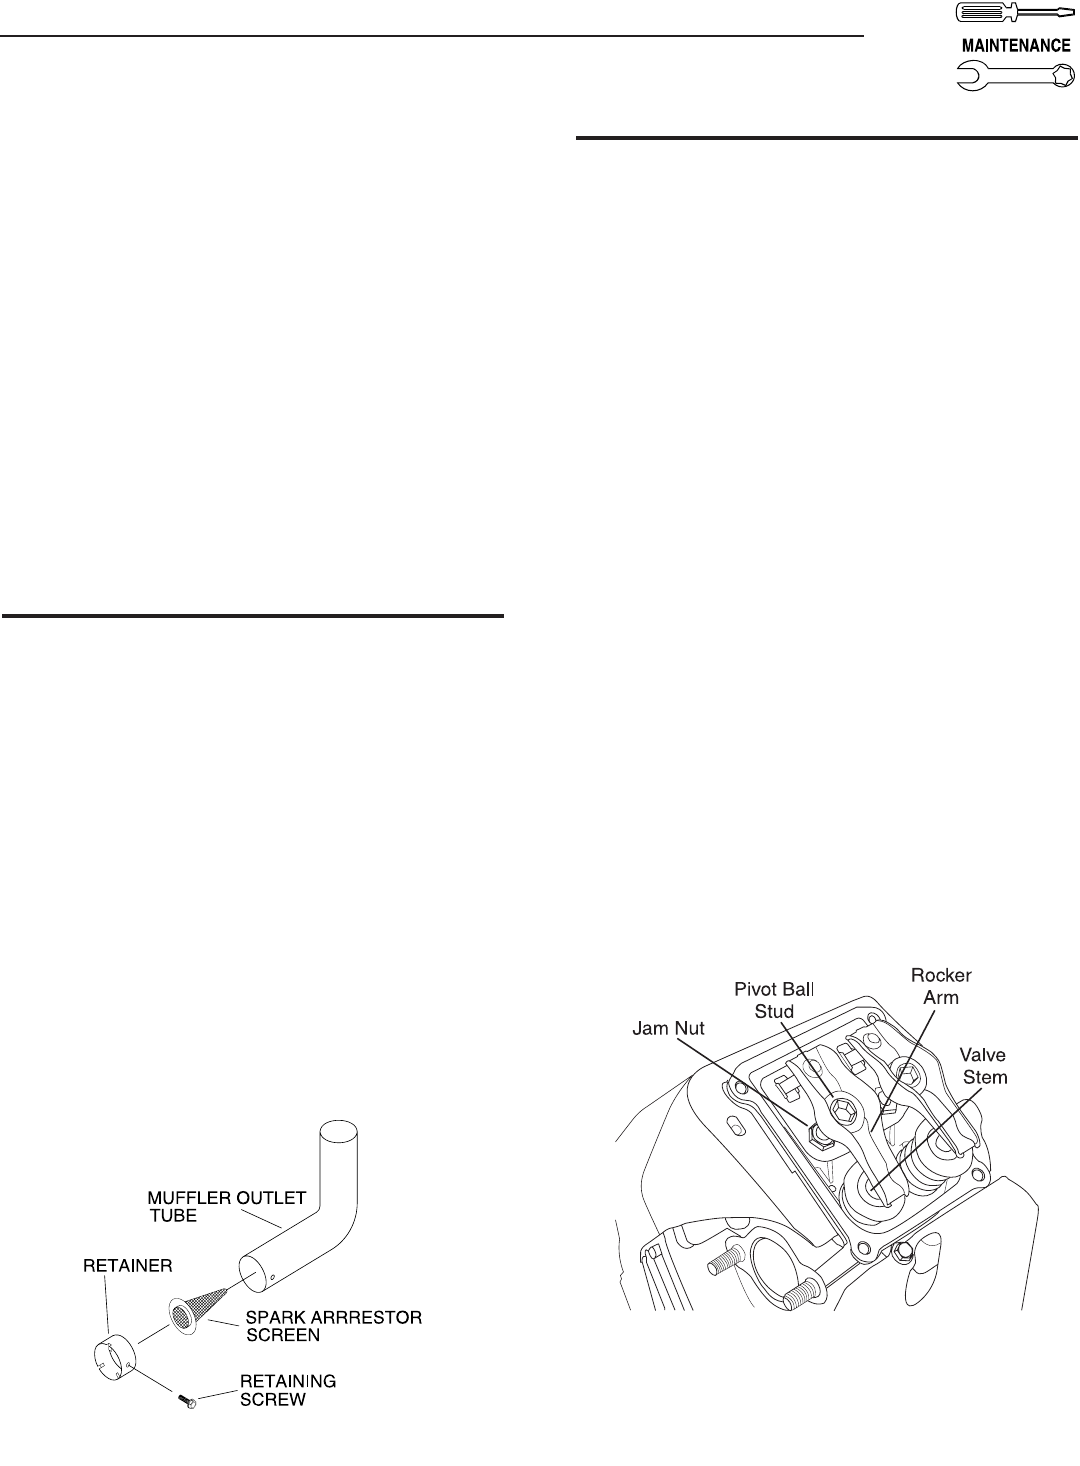
3.5 CLEAN SPARK ARRESTOR SCREEN
The engine exhaust muffler has a spark arrestor screen. Inspect and
clean the screen at least once each year (Figure 20). If unit is used
regularly, inspect and clean more often.
NOTE:
If using the generator on any forest-covered, brush-covered
or grass-covered unimproved land, it must equipped with a
spark arrestor. The spark arrestor must be maintained in good
condition by the owner/operator.
Clean and inspect the spark arrestor as follows:
Remove the screen retaining bracket by removing the screw.
Slide the spark arrestor screen out from the tail pipe.
Inspect screen and replace if torn, perforated or otherwise
damaged. DO NOT USE a defective screen. If screen is not
damaged, clean it with commercial solvent.
Replace the screen and the retaining bracket.
Figure 20 - Spark Arrestor
•
•
•
•
•
•
•
•
•
•
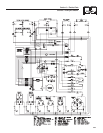
3.6 ADJUSTING VALVE CLEARANCE
After the first 50 hours of operation, check the valve clearance in
the engine and adjust if necessary.
Important: If feeling uncomfortable about doing this procedure or
the proper tools are not available, please take the generator to the
nearest service center to have the valve clearance adjusted. This is a
very important step to insure longest life for the engine.
To check valve clearance:
Make sure the engine is at room temperature (60° - 80° F).
Make sure that the spark plug wire is removed from the spark plug
and out of the way.
Remove the four screws attaching the valve cover.
Make sure the piston is at Top Dead Center (TDC) of its
compression stroke (both valves closed). To get the piston at
TDC, remove the intake screen at the front of the engine to gain
access to the flywheel nut. Use a large socket and socket wrench
to rotate the nut and hence the engine in a clockwise direction
while watching the piston through the spark plug hole. The piston
should move up and down. The piston is at TDC when it is up as
high as it can go.
Insert a 0.002 - 0.004 inch (0.05 - 0.1mm) feeler gauge between
the rocker arm and valve stem. Correct clearance is when a slight
drag is felt when sliding the gauge back and forth. If the clearance
is either excessively loose or tight the rocker arms will need
adjusting.
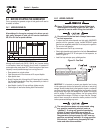
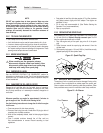
To adjust valve clearance:
Loosen the rocker jam nut (Figure 21). Use an 10mm allen wrench
to turn the pivot ball stud while checking clearance between
the rocker arm and the valve stem with a feeler gauge. Correct
clearance is 0.002-0.004 inch (0.05-0.1 mm).
Figure 21 - Valve Clearance Adjustment
NOTE:
The rocker arm jam nut must be held in place as the pivot ball
stud is turned.
•
•
•
•
•
•
Section 3 — Maintenance