


1312
GG
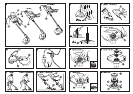
5.1 How to connect the
String Trimmer – cable lock /
extension cable (ill. A/B)
Loop the extension cable (1) and
insert it into the cable lock (2).
This prevents unintentional dis-
connection of the electrical plug.
Then plug into the mains cable.
To switch on, depress the push-
button (3) on the handle (4).
The String Trimmer will switch
off as soon as the push-button
is released.
A
The safety devices in-
stalled by the manufac-
turer must not be removed
or by-passed, e.g. by binding
the on/off switch to the handle.
This will prevent the trimmer
switching off automatically,
and may cause serious injury.
Attention! The trimming string
will take a while to stop running
after the unit is switched off.
5.2 Working position (ill. C)
Ensure that you have a secure
foothold when working. Hold your
String Trimmer with one hand
on the handle (4), with the other
on the guide handle (5).
5.3 Trimming along lawn edges
and in awkward places (ill. D)
(String Trimmer TS 350 L /
TS 530 Duo L)
Guide your String Trimmer using
the handle (4) and the guide
handle (5).
For vertical cutting, e. g. for
trimming lawn edges, turn the
cutting unit as described under
5.6 below.
5.4 Trimming along the base
of walls, fences and around
trees (ill. E)
Guide your String Trimmer with
the left side of the cover at a
short distance from hard objects
and surfaces.
5.5 Removing dirt from joints
between pavers (ill. C/D)
Hold the String Trimmer in such
a way that the cutting string (6)
runs slightly inclined just above
the pavers.
5.6 Turning and swivelling
the cutting tool, telescopic
adjustment (ill. D/F)
Turning
(for trimming lawn edges)
(String Trimmer TS 350 L /
TS 530 Duo L)
Loosen the tightening nut (7)
on the motor casing. The con-
necting tube with the cutting tool
can then be turned by up to 180°.
Secure the cutting tool in the
desired position by tightening
the nut.
Telescopic adjustment
(to suit the operators height)
(String Trimmer TS 350 L /
TS 530 Duo L)
Loosen the tightening nut (7)
on the motor casing. The length
of the connecting tube with the
cutting tool can then be adjusted
by up to 100 mm.
Swivelling
(for mowing on slopes, under
bushes and garden furniture)
(String Trimmer TS 530 Duo L)
By depressing the switch (8),
you can swivel or incline the
handle into two other angles
of 15° allowing three different
working positions (ill. F).
5.7 Adjusting the guide
handle (ill. F) (String Trimmer
TS 350 L / TS 530 Duo L)
By releasing the adjustment
element (9) you can adjust the
guide handle to the desired
working position.
Adjust the position of the guide
handle to suit your body height
so that the String Trimmer can
be guided just above the ground
with an ideal weight balance.
5.8 Automatic string lengthen-
ing procedure with the motor
running (ill. G) (String Trimmer
TS 350 / TS 350 L)
A clean cut will only be achieved
with the maximum cord length.
Tap your trimmer sharply on
the ground. Avoid sustained de-
pression. Ensure that the cutting
head is parallel to ground. The
cord will automatically lengthen.
Listen for audible switching action.
If the string is too long, it will be
automatically adjusted to the
correct length by the string limiter
blade (10).
5.9 Automatic string lengthen-
ing procedure with the motor
running
(String Trimmer TS 530 Duo L)
A clean cut will only be achieved
with the maximum cord length.
Briefly press and release the
switch (11) to start/stop the
motor. This causes automatic
lengthening of the string. Listen
for audible switching action. If the
string is too long it will be auto-
matically adjusted to the correct
length by the string limiter blade
(10).
5.10 Manual string lengthening
(ill. H)
1. Disconnect the mains plug!
2. Depress the release (12)
and manually pull out string
or strings until it stops.
If necessary, repeat this proce-
dure until the string just pro-
jects over the edge of the
cover.
While the String Trimmer is
being operated, the string length
is adjusted automatically as de-
scribed under “Automatic string
lengthening”.
A
Be careful with the cut-
ting blade/string limiter
(10) whilst lengthening the
string by hand. Risk of injury!
5. Using the product (ill. A-H)
The GARDENA String Trimmers
require mimimal maintenance.
Make sure that the cooling air
inlets (13) never become ob-
structed by dirt.
Remove grass clippings and dirt
with a dry cloth or brush. Remove
grass clippings and dirt from the
safety cover (14) after every use.
Repairs may only be carried
out by GARDENA Service
Centres or dealers authorised
by GARDENA.
A
Attention! Always dis-
connect the mains plug
before working on the String
Trimmer (checking, cleaning,
maintenance). Risk of injury!
To avoid injury to persons and
product damage: Ne
ver clean
the String Trimmer with running
water or with a water jet, in
particular a high pressure
water jet.
Store the String Trimmer in a
dry place where it is protected
from frost.
We recommend hanging
storage to avoid unnecessary
stress on the cutting head.
The String Trimmer should
be stored out of the reach of
children.
Follow the manufacturer’s
instructions when replacing
the string cartridge.
6.1 How to replace the string
Please use only the original
GARDENA String Cartridges.
Art. No. 5371
for String Trimmer TS 350 /
TS 350 L
Art. No. 5372
for String Trimmer TS 530 Duo L
You can order these string
cartridges from your GARDENA
dealer or directly from the
GARDENA customer service.
Never use metallic cutting
cartridges or spare parts and
accessories which have not
been defined by the manu-
facturer!
String Trimmer TS 350 /
TS 350 L (ill. I/K)
Disassembly (ill. I)
1. Disconnect the mains plug!
2. Keep the reel holder (16) in a
fixed position. Unlock the cover
(17) by turning it to the left.
Remove the reel.
Assembly (ill. I/K)
1. Make sure the bayonet lock
(18) of the reel holder (16) is
free of dirt.
2. Introduce the string in the
filament guide of the cover
(17), then insert the reel.
3. Keep the reel holder (16) in
a fixed position.
4. Insert the cover with the reel
(17), press down and turn to
the right until the end stop.
Ensure that the marks on the
reel holder (16) and on the
cover (17) perfectly match
(ill. I1).
Ensure correct working
position before switching on
the String Trimmer.
String Trimmer TS 530 Duo L
(ill. L/M)
Disassembly (ill. L)
1. Disconnect the mains plug!
2. Keep the reel holder (19) in a
fixed position. Unlock the cover
(20) by turning it to the left.
Remove the reel.
Assembly (ill. L/M)
1. Introduce first the lower string
(21), then the upper string (22)
in the string guides (23) of
the reel holder (19), then insert
the reel completely in the reel
holder (19).
2. Keep the reel holder (19) in a
fixed position, insert the cover
(20), press down and secure
by turning to the right until
it stops.
3. Ensure that the arrows on
the reel holder (19) and on the
cover (20) match perfectly
(ill. L1).
Ensure correct working
position before switching on
the String Trimmer.
If you have any problem with your
String Trimmer, please contact
our Customer Service or return
the defective unit together with
a short description of the problem
and, if covered under guarantee,
with the warranty card duly
completed and signed, directly
to one of the GARDENA Service
Centres listed on the back of
this leaflet.
We expressly point out that,
in accordance with the product
liability law, we are not liable
for any damage caused by our
units if it is due to improper
repair or if parts exchanged are
not original GARDENA parts
or parts approved by us, and,
if the repairs were not carried
out by a GARDENA Service
Centre or an authorised spe-
cialist. The same applies to
spare parts and accessories.
6. Maintenance, service, storage