


16 17
GG
K
Plug for charger
L
Charging socket in housing
M
Mains plug for charger
N
Turning knob for Accu cover
O
Receptacle for tabs
P
Tabs on Accu
Q
Key
R
Thickness gauge
S
Hexagon thread bolt
(to adjust cutting tool)
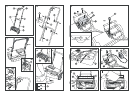
4.3 Assembling the Guide
Handle (Fig. A/B/C)
Assemble the guide handle as
follows:
1. Guide the upper section of
the guide handle
3
into the
grooves of the two middle
sections of the guide handle
4
(Fig. B)
2. Screw the upper section
3
to both middle sections of the
guide handle
4
using the bolts
and wing nuts provided
6
.
3. Guide the lower part of the
guide handle
5
into the
grooves of the middle sections
of the guide handle
4
(Fig. B)
and screw together with the
bolts and wing nuts provided
6
.
4. Push both sides of the guide
handle with the opening
0
over the handle bolts
A
as
shown in Fig. C1.
Note: Make sure that the
groove in the drilled hole and
the safety pin of the handle
bolt
A
meet.
Warning! Do not use exces-
sive force. First ensure that
the opening
0
and bolt
A
are aligned and then fix
together.
4.4 Assembling the Starting
Device (Fig. C2-C4)
To assemble the starting device,
both holes (a) must be on your
right hand side when standing
behind the mower (in the direc-
tion of movement).
1. Pull open the clamps (b) of the
starting device (15a) (Fig. C2).
2. Guide the two pin receptacles
(c) of the lower clamp into the
holes (a) and
3. insert the two pins (d) of the
upper clamp into the holes
(Fig. C3).
4. Press the two clamps back
together.
5. Screw the assembled clamps
onto the guide handle using
the two Phillips screws provid-
ed (Fig. C4).
6. Secure the cable to the handle
using the cable clips
7
.
Warning! The cable must not
hang down near the cutting
cylinder.
4.5 Setting the Cutting Height
(Fig. D/ D1)
A
Warning! To prevent
injury, never set the cut-
ting height when the motor
is running.
Set the cutting height on the Accu
Cordless Motor Mower as follows:
1. Stand the Accu Cordless Motor
Mower on a flat, solid surface.
2. Position yourself in front of the
cutting height scale of the Cord-
less Motor Mower (Fig. D1).
3. Loosen both fixing nuts
9
(Fig. D).
4. With both hands on the adjust-
ing handles
B
set the cutting
height you require (Fig. D1):
Highest cutting height: 45 mm
Lowest cutting height: 20 mm
Note: Make sure that the
arrows marking the cutting
height
8
show the same
cutting height on both sides
of the scale (Fig. D2).
5. Re-tighten both fixing nuts
9
(Fig. D).
Note:When setting the Cord-
less Motor Mower to a low
cutting height, ensure that
the lower blade and cutting
cylinder do not touch the
ground if the ground is
uneven.
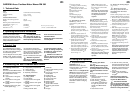
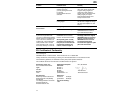
Accu
Design maintenance-free lead battery
Voltage/capacity 12 V / 7.2 Ah
Weight approx. 2.4 kg
Cordless Motor Mower
Width of the cutting cylinder 38 cm
Weight approx. 12 kg
Working area related emission
characteristic value L
pA
1)
70 dB(A)
Noise level L
WA
2)
84 dB(A) Measuring method acording to
Vibrations a
vhw
1)
< 2.5 ms
-2
1)
EN 836
2)
directive 2000/14/EC
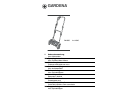
GARDENA Accu Cordless Motor Mower RM 380
1. Technical Data
Please read and follow these
operating instructions carefully.
Familiarise yourself with the unit’s
features, its proper use and the
safety instructions included.
A
For safety reasons chil-
dren under the age of
16 or people not familiar with
these operating instructions
must not use this Accu Cord-
less Motor Mower.
Please keep these instructions
in a safe place.
2. Operating Instructions Information
The GARDENA Accu Cordless
Motor Mower RM 380 is designed
for cutting and aerating lawns in
and around the garden.
It is not designed for use in public
facilities, parks, sporting grounds,
on roads, in agriculture or forestry.
It is essential to observe the
manufacturer’s operating instruc-
tions to ensure the unit’s proper
functioning.The operating instruc-
tions also contain advice for
service, maintenance and repair.
A
Attention! To prevent
injury, the Accu Cordless
Motor Mower must not be used
for trimming bushes, hedges,
shrubs, for cutting and pruning
of climbers or grass on roofs
or in balcony boxes.
A
Attention! For risks of in-
jury the Accu must not be
used as power source for other
devices.
3. Product Use
4.1 Checking all Parts are
Included
The Accu Cordless Motor Mower
box contains the following parts:
.
Cordless Motor mower
.
1 Accu
.
1 upper section of the guide
handle
.
1 lower section of the guide
handle
.
2 middle sections of the guide
handle
.
Assembly parts for the guide
handle (plastic bag)
.
1 key (battery compartment)
.
1 Accu charger
.
1 thickness gauge
.
Operating instructions
4.2 Operating Parts
1
Cutting cylinder
2
Lower blade
3
Upper section of the guide
handle
4
Middle sections of the guide
handle
5
Lower section of the guide
handle
6
Wing nuts with bolts
7
Cable clip
8
Cutting height marking arrows
9
Fixing nuts
0
Opening for snug and
handle bolts
A
Handle bolts
B
Adjusting handles
C
Cover for the Accu
D
Release knob
E
Starting handle
F
Grass catcher
G
Grass catcher holders
H
Hooks for grass catcher
I
Accu
J
Charger
4. Assembling the Accu Cordless Motor Mower
5.1 Preparation for Initial
Operation (Fig. E)
Assemble the Accu
I
as de-
scribed in section 7.2 „The Accu
– Changing the Accu“.
Note: the Accu is charged at the
factory but may loose its capacity
if it has been stored for a long
time. If the Accu is flat when you
purchase your Cordless Motor
Mower or immediately after use,
you must recharge the Accu as
described in section “Charging
the Accu”.
5.2 Starting your Mower
(Fig. A/E)
Warning! Before starting your
Cordless Motor Mower check
for foreign bodies in the cutting
cylinder and remove if neces-
sary.
Start your Cordless Motor Mower
as follows:
1. Stand your mower on a level
part of the lawn.
2. Open the accu cover
N
.
3. Insert the key
Q
(supplied
in the battery compartment)
the right way round into the
socket of the Motor Mower
(Fig. E).
4. Close the accu cover.
5. To start the motor, press and
hold down the release knob
D
and with the other hand, simul-
taneously pull the starting han-
dle
E
towards the cross bar
(Fig. A).
6. If you release the starting
handle
E
the motor switches
off again.
Important! Always keep the
accu cover closed when work-
ing with the Motor Mower!
A
The switches installed
by the manufacturer must
not be removed or be bridged
eg: by taping down the starting
handle
E
to the guide handle.
5. Putting into Operation