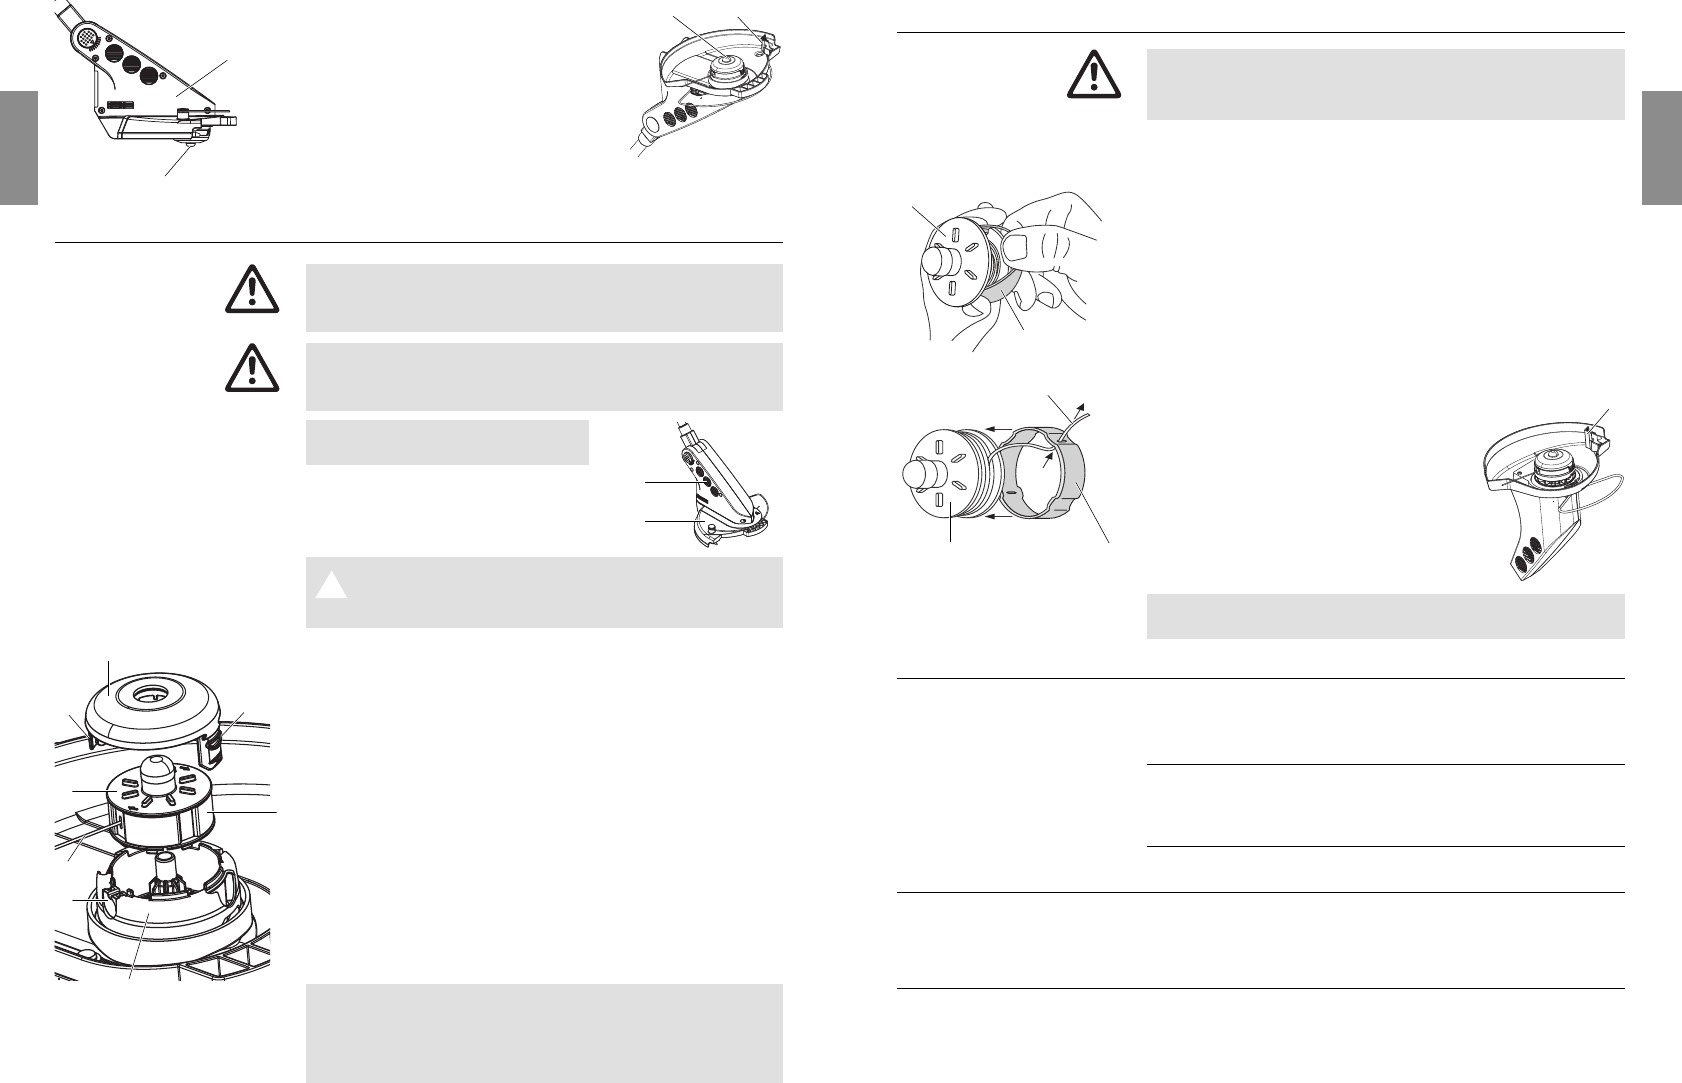
I
E
K
M
N
J
J
L
Replacing the filament
cassette:
13
GB
12
GB
Risk of injury!
Pulling the filament
out of the filament cassette:
L
K
E
5. Trouble-Shooting
Risk of injury from the cutting filament!
V Always unplug the mains plug of the Turbotrimmer be-
fore troubleshooting.
If a filament is drawn into the filament cassette you can pull it out
again as described below.
1. Unplug the mains plug.
2. Remove the filament cassette as described under 4. Mainte-
nance
“Replacing the filament cassette” .
3. Press together the plastic ring
L
on the filament cassette
E
between your thumb and forefinger.
4. Draw the plastic ring
L
with the thumb of the other hand over
the side part of the filament cassette
E
(use a screwdriver
if necessary).
You can now access the filament that was drawn into the fila-
ment cassette.
5. Unwind the filament
K
approximately 10 cm and thread
it through the eye of the plastic ring
L
. If ne-
cessary, loosen the filament beforehand
using a screwdriver.The filament
K
may stand out max. 2 cm over the
knife
F
.
6. Pull the plastic ring
L
back over the
filament cassette
E
.
7. Reinstall the filament cassette as described
under 4. Mainte-nance
“Replacing the
filament cassette”.
Only GARDENA Service Centres and authorised specialist
GARDENA dealers may carry out repairs.
Fault Possible cause Remedy
The Turbotrimmer Filament worn or too short. v Lengthen the filament –
no longer cuts. see 3. Operation
“Filament
feed (Tip mechanism for
automatic filament feed
)”.
Filament cassette empty. v Replace the filament cassette
– see 4. Maintenance
“Replacing the filament
cassette”
).
Filament drawn into the v Pull the filament out of the
cassette or stuck together. filament cassette (see above).
If you have any other problems please contact the GARDENA Customer Service.
6. Storage
The Turbotrimmer must be stored out of the reach of children.
v Store your Turbotrimmer in a dry place where it is protected
from frost.
Risk of injury!
Risk of injury!
Cleaning the cover
and ventilation slots:
F
E
1. Leave the motor running.
2. Hold the cutting head
7
parallel to the
ground and tap the filament cassette
E
of the Turbotrimmer on the ground
several times in succession (approx.
3 times) (avoid applying sustained
pressure to the Turbotrimmer).
The filament is lengthened automatically.
Listen for the audible switching action.
The filament limiter
F
adjusts the filament to the correct length.
4. Maintenance
There is a risk of injury from the cutting filament!
V Always unplug the mains plug of the Turbotrimmer be-
fore carrying out maintenance work!
Risk of injury and risk of damage to property!
V Never clean the Turbotrimmer under running water or
with a water jet (in particular a high pressure water jet).
The ventilation slots must always
be free of dirt.
v Remove any grass and dirt from
the cover
G
and ventilation slots
H
after each use.
Risk of injury!
A V Never use metallic cutting elements or replacement
parts and accessories not provided by GARDENA.
Only use original GARDENA Filament Cassettes.You can
order Replacement Filament Cassettes from your GARDENA
dealer or directly from the GARDENA Customer Service.
• Filament Cassette for Turbotrimmer powerCut: Art. No. 5367-20
1. Unplug the mains plug.
2. Turn over the Turbotrimmer and rest it on the rubber buffer
of the handle.
3. Release the cassette cover
I
by pressing both locking clips
J
and remove the cover.
4. Remove the filament cassette
E
.
5. Remove any dirt.
6. Pull approximately 5 cm of the filament
K
out of the new
filament cassette
E
through the hole in the plastic ring
L
.
7. Insert the filament cassette
E
in the filament cassette holder
M
so that the filament
K
is inside the metal case
N
.
8. Fit the cassette cover
I
on the filament cassette holder
M
so
that you hear both locking clips
J
click into place.
When replacing the cover, ensure that the filament is inside the
metal case and is not trapped.
v If the cassette cover
I
cannot be touched down, turn the
filament cassette
E
to and fro, until the filament cassette
E
is completely in the filament cassette holder
M
.
E
7
H
G
F
L
E


