


N
O
O
P
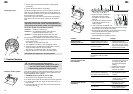
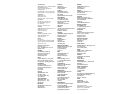
Replacing aerator cylinder:
19
G
18
G
5. Push new aerator cylinder onto
drive shaft so that the torsion
bar
S
fits in the gap in the drive
shaft
P
.
6. Lift new aerator cylinder and place
wheel with end plate
N
on the
aerator cylinder.
7. Lower wheel with end plate
N
onto
the underside of the housing and, during this process, ensure
that the parts are not placed under stress.
8. Bolt wheel with end plate
N
to the underside of the housing
using bolts
M
without over tightening the bolts.
9. Set to wear adjustment position 1
(see 6. Maintenance
“Adjusting for wear”
).
Problem Possible Cause Remedy
Abnormal noise. Foreign bodies on the aerator 1. Switch off the Aerator,
Clattering in the unit cylinder are hitting the Aerator. remove the mains plug from
Whistling sound Foreign bodies blocking
the socket and wait until the
the aerator cylinder.
Aerator has stopped rotating.
2. Remove foreign bodies.
Cogged belt slipping. v Contact GARDENA Service.
Motor will not start Faulty cable. v Check cable.
The conductor cross-section of v Contact your electrician.
the extension cable is possibly
too low.
Motor cuts out because Blocked by foreign bodies. 1. Switch off the motor,.
blocking protection has remove the mains plug from
been activated the socket and wait until
the Aerator has stopped
rotating.
2. Remove foreign bodies.
3. After approx. 1 minute
switch on the Aerator.
Aerating depth too large (aerator 1. Leave motor to cool down.
cylinder has been adjusted for 2. Set adjustment for wear
wear without wear to the knives). correctly.
The grass is too tall. v Mow the lawn before
aerating (see 3. Function
“Correct Aerating”
).
Aerating results are not Aerator cylinder is worn. v Adjust aerator cylinder
satisfactory (see Maintenance).
Cog-belt faulty. v Allow GARDENA Service
to change the cog-belt.
Adjusting for wear:
M
1. Remove grass and deposits from wheels, aerator cylinder
and housing.
2. Remove dirt from air inlets on the housing.
The Aerator is subject to wear in use due to the way in which it
works.The more intensively the Aerator is used, the greater the
wear on the knives. Hard or very dry ground accelerates wear as
does excessive use of the Aerator.
If the results of your work with the Aerator become increasingly
worse due to knife wear, the aerator cylinder can be adjusted
twice.
Note:Wear adjustment is not used for height adjustment.
Adjustment of the aerator cylinder without visible wear can
cause damage to the aerator cylinder or overload the motor.
The aerator cylinder has 3 adjustment positions:
• Position 1: Position set at the factory
• Position 2: First adjustment position after knife wear
(aerator cylinder lowered by 3 mm)
• Position 3: Second adjustment position after knife wear
(aerator cylinder lowered by a further 3 mm)
The openings for the retainers on the wheels must be free of dirt.
1. Press retaining spring
K
together and pull out the adjustment
unit
L
approx. 6 mm.
The wheel is no longer fixed to the axle.
2. Turn adjustment unit
L
90° to the next highest position.
3. Press the centre of the adjustment unit
L
until the retaining
spring
K
audibly snaps into the new position.
The wheel is now fixed to the axle in the new position.
4. Adjust the wheel on the other side to the same position.
Both wheels must always be in the same position.
7. Trouble-Shooting
The aerator cylinder can cause injuries !
A V Prior to rectifying faults, unplug from the mains
and wait until the aerator cylinder has stopped.
V Wear working gloves when rectifying faults.
If the aerator cylinder is in wear adjustment position 3 and is worn,
the aerator cylinder must be replaced. It is only permitted to use
original GARDENA aerator cylinders.
• GARDENA Aerator Cylinder for Art. No. 4062
1. Undo bolts
M
on the underside of the housing.
2. Lift wheel with end plate
N
and remove from aerator cylinder
O
.
3. Lift aerator cylinder
O
at an angle and pull off from bar of the
drive shaft
P
.
4. Push new spring
Q
, new stop,
R
and new torsion bar
S
into
new aerator cylinder
O
.
SRQO
O S P
L
K