


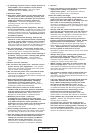
D. ASSEMBLY / DISASSEMBLY
BAR AND CHAIN ASSEMBLY
Take great care when assembling to ensure this is performed correctly.
ENGLISH - 6
E. START-UP AND STOPPING
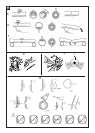
Start-up: grip both handles firmly, release the chain
brake lever whilst ensuring hand is still on front
handle, press and maintain the switch block (fig E1)
pressed in, then press the switch (fig E2) (at this
point the switch block can be released).
Stopping: The machine will stop whenever the
switch is released or by activating the chain brake.
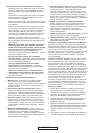
F. BAR AND CHAIN LUBRICATION
ATTENTION! Insufficient lubrication will provoke
chain breaking and can cause serious injury.
Refer to “Maintenance & Storage” for indications on
ensuring that the chain oil is sufficiently distributed.
Choice of chain oil
Use oil which is approved by the manufacturer.
We advise the use of bio chain oil which is
biologically degradable.
Filling oil tank
Unscrew the oil tank cap, and fill the tank taking
care not to spill any oil (if this occurs clean the
machine carefully) and then screw the cap back on
tightly.
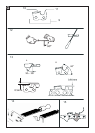
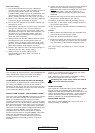
Remove the plug from the power supply before working on the product.
1. Check that the chain brake is not activated. If so, deactivate it.
2a & 2b. Flip out the the bar retaining inner knob and rotate in an anti-clockwise direction to remove
the drive sprocket cover.
Wear Gloves.
3 Position the chain over the bar, starting at the nose sprocket, fitting it into the guide bar groove.
Ensure that the sharp side of the cutting teeth face in a forward direction on the upper part of the bar.(see
markings on the bar)
4. Mount the bar on the bar retaining screw ensuring it is as far back towards the drive sprocket as possible
Position the chain over the drive sprocket and pull the guide bar forward to pre-tension the chain.
5. Replace the drive sprocket cover and turn the bar retaining inner knob in a clockwise direction until
loosely tightened.
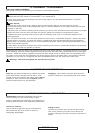
6 & 7. To tension the chain, turn the chain tensioner outer knob in a clockwise direction. Tension the chain
until the tension is correct. To check the tension, pull the chain away from the bar and ensure gap measures
approx 2-3mm. To reduce tension turn in an anti-clockwise direction. (when performing this operation, keep
the bar nose raised upwards)
8a & 8b. When the tension is correct turn the bar retaining inner knob in a clockwise direction until securely
tightened and flip back into position to secure.
Tensioning the chain too tightly will overload the motor and cause damage. Insufficient tension can provoke
chain derailing, whereas a chain tightened correctly provides the best cutting characteristics and prolonged
work life. Check the tension regularly because the chain length tends to stretch with use (especially when
the chain is new; after the first assembly, the chain tension must be checked after a few minutes machine
operation); in any case do not tighten the chain immediately after use, but wait until it cools down.
Warning:- The chain and guide bar can become very hot