


18
GB
7. Maintenance, Care, Storage
7.1 Storage
The cable-plug-connection of the Rain Sensor must be disconnected
from the water controller and the Rain Sensor removed from the ground
before the frosty season begins.
Over the winter, clean and store the Rain Sensor in a dry and dust-free
place away from frost.
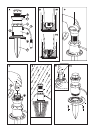
7.2 Cleaning (Fig. G)
To ensure that the Rain Sensor works properly, keep the lens
7
clean.
Clean the lens as follows:
1. Unscrew the nut
4
from the lens-receptacle
5
(Fig. G1).
2. Remove the housing
6
.
3. Clean the lens
7
with a clean, soft, damp cloth (Fig. G2).
Note: If the Rain Sensor is really dirty, the inside of the lens-receptacle
5
should also be cleaned, e.g. with clean water (Fig. G3). Unscrew
the lid
8
and remove the cone
0
.
Do not use any harsh household cleaning agents or scouring
powder!
4. Dry the lens.
Warning! Use a clean, dry, soft cloth to prevent scratching.
5. Replace the housing
6
on the lens-receptacle
5
. Secure the lens-
receptacle with the nut
4
by compressing the spring
9
(Fig. G4).
7.3 Change the battery once a year
To ensure that the Rain Sensor works properly we recommend you ex-
change the battery at least once a year (see also “Inserting the Battery”).
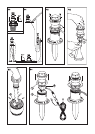
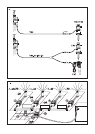
8. Accessories available
If the connection cable on the Rain Sensor is not long enough, it can be
extended using the 10 m Extension Cable, GARDENA Art. No. 1186 up
to a maximum of 105 m (Fig. H).
To consider the soil moisture in addition to the natural precipitation, the
GARDENA Adaptor 1189-00.630.00 (obtainable at GARDENA Service)
may be used. Both the Rain Sensor Electronic and the Soil Moisture
Sensor may be connected to the water controller (Fig. H).
This will prevent the start of the watering program when the rain sensor
indicates dry but the soil moisture is sufficient.