


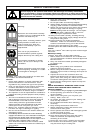

SAFETY PRECAUTIONS
13.Remove the plug from the mains :
- before leaving the trimmer unattended for any period;
- before clearing a blockage;
- before checking, cleaning or working on the appliance;
- if you hit an object. Do not use your trimmer
until you are sure that the entire trimmer is in a
safe operating condition.
- if the trimmer starts to vibrate abnormally. Check
immediately. Excessive vibration can cause injury.
Maintenance and storage
1. Keep all nuts, bolts and screws tight to be sure
the trimmer is in safe working condition.
2. Replace worn or damaged parts for safety.
3. Only use the replacement cutting line specified
for this product.
4. Only use replacement parts and accessories
recommended by Electrolux Outdoor Products.
5. To avoid the risk of injury keep fingers and
hands clear of the line cutter on the leading edge
of the guard.
6. Inspect and maintain the trimmer regularly. Any
repairs must be carried out by an authorised
repairer.
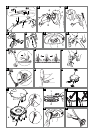
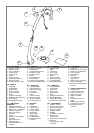
ASSEMBLY INSTRUCTIONS
Shaft Assembly (A)
1. Locate the lower shaft (A1) into the upper shaft
(A2).
Note: the black internal cable and cable
protection sleeve (A3) are self-locating
2. Grasp firmly and hold steady the lower shaft.
Locate the upper shaft and snap together firmly.
• The unit is correctly assembled when the gap
between the upper and lower shaft has been
closed.
Safety Guard Assembly (B) & (C)
1. Align the arrow on the top of the safety guard (B1)
with the arrow on the side of the trimmer (B2).
2. Locate the safety guard (B3) over the cutting head
(B4). Ensure the nylon lines are fed through the
hole in the safety guard as illustrated in fig B.
3. Push into location and turn safety guard in the
direction illustrated in Fig C, until a click is heard
and the safety guard is securely locked in position.
• ENSURE THE SAFETY GUARD IS SECURELY
IN PLACE BY ATTEMPTING TO TWIST GUARD.
CABLE RESTRAINT
Cable Restraint (D) & (E)
1. Form loop in mains cable and push the loop
through the slot as illustrated in picture (D).
2. To secure, position loop over the hook and pull
the cable back through the slot as illustrated in
picture (E).
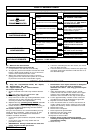
DOUBLE AUTO FEED SYSTEM
F1 - Line cutter
How the automatic line feed works (F)
1. When initially switching on the trimmer, a small
length of line is fed out.
2. A ‘clattering’ noise will be heard when the two nylon
lines hit the line cutter. DO NOT BE ALARMED
this is quite normal. After approximately 5 seconds
the line will be cut to the correct length and the
noise will reduce as the motor reaches full speed.
• Make sure the motor is up to full speed
before trimming or edging.
3. If the noise of the nylon line being cut cannot be
heard, more line will need to be fed out.
4. To feed more line, it is first necessary to to allow
the motor to stop completely, then re-start,
allowing the motor to reach full speed.
5. Repeat step 4. until you hear the lines hitting
against the cutter. (Do not repeat this procedure
more than 6 times)
6. If problems are experienced with the automatic
line feed refer to Fault Finding Chart.
HOW TO TRIM AND EDGE
WARNING
The use of eye protection is recommended.
Do not lean over the trimmer whilst trimming or
edging, objects may be thrown by the cutting
line. Do not allow cutting head to rest on the
ground. Do not overload your trimmer.
Overloading can be avoided by making sure the
motor speed does not drop unduly. Disconnect
from the mains electricity supply before
attempting any maintenance or adjustment.
• BEFORE USE
Make sure that both lines are fed out.
• Make sure motor is up to full speed before
trimming or edging.
How to trim
1. Hold as illustrated in Fig H.
2. To start, press the lock-off button down (G1),
whilst pressing the lock-off button squeeze the
switch lever (G2).
3. When the trimmer starts release the lock-off
button (G1).
4. Cut with nylon line at an angle using the tip See
Fig H.
5. Swing trimmer in and out of the cutting area
taking small cuts. See Fig J.
6. Line is fed out automatically every time the
trimmer head stops rotating and returns to
operating speed.
• Extra line can be fed out manually as described
on page 3.
7. To stop your trimmer release the switch lever (G2)
How to edge
1. Hold as illustrated in Fig L.
2. To start, press the lock-off button down (K1),
whilst pressing the lock-off button squeeze the
switch lever (K2)
3. When the trimmer starts release the lock-off
button (K1).
4. Rest edger on roller for extra stability and line up
with the edge of the lawn, see fig M. Edge in
direction indicated in fig L so that debris is
thrown away from you.
5. To stop your trimmer release the switch lever (K2).
6. To return to trimming mode, turn trimmer over.
• Ensure the electric cable is not snagged or
pulled around sharp objects.
ENGLISH - 2