


Troubleshooting, Adjustment & Service
PTO Drive Belt Removal
1. Park the tractor on a smooth, level surface such as a
concrete floor. Disengage the PTO, engage the
parking brake, turn off the engine, and remove the
ignition key.
2. Release the hood cam latches and raise the hood
until it locks in place.
3. Release the rear guard cam latches and lower or
remove the rear guard.
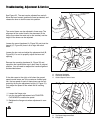
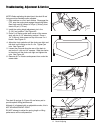
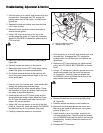
4. Using a 3/4” box end wrench on the nut of the
spring-loaded idler pulley (A, Figure 48), rotate the
wrench CLOCKWISE to release the tension on the
PTO drive belt.
5. Remove the belt from the stationary idler pulley (B,
Figure 48).
6. Carefully release the tension on the wrench.
7. Remove the belt from the PTO clutch pulley, spring-
loaded idler pulley and center spindle pulley.
8. Pull the belt towards the rear of the machine until
free of the guide pulleys and belt keeps on the rear
of the mower deck.
PTO Drive Belt Replacement
1. From the rear of the mower deck, route the new belt
through the guide pulleys and belt keeps.
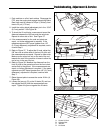
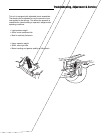
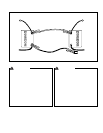
2. Install the belt on the center spindle pulley. Follow
the illustration in Figure 49 carefully. Make sure the
belt twists in the correct direction.
3. Install the belt over the PTO clutch pulley and the
spring loaded idler pulley. Again, follow the illustra-
tion in Figure 49 carefully and make sure the belt
twists in the correct direction.
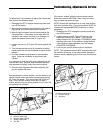
4. Using a 3/4” box end wrench on the nut of the idler
pulley (A, Figure 48), rotate the wrench CLOCKWISE
and install the belt on the stationary idler pulley.
5. Carefully release the tension on the wrench.
WARNING
Use extreme caution when rotating the idler
pulley with the wrench, due to the increased
tension in the spring as the idler pulley is being
rotated. Injury may result if the wrench is
prematurely released while the spring is under
tension.
Spindle Drive Belt Removal & Replacement
1. Park the tractor on a smooth, level surface such as a
concrete floor. Disengage the PTO, engage the
parking brake, turn off the engine, and remove the
ignition key.
2. Remove the PTO drive belt from the center spindle
pulley (see
PTO DRIVE BELT REMOVAL
for instruc-
tions).
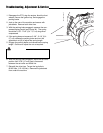
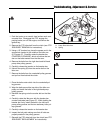
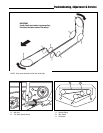
3. Using a 1/2” breaker bar, place the square end in the
square hole located near the end of the idler arm
(A, Figures 50). Carefully rotate the breaker bar
CLOCKWISE, which will relieve the tension on the
belts exerted from the idler arm.
4. Remove the belt from the trim side spindle pulley
(B, Figure 50).
5. Carefully release the tension on the breaker bar.
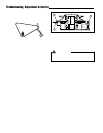
6. Remove the old belt and replace with a new one.
Make sure the V-side of the belt runs in the pulley
grooves (Figure 51).
7. Install the belt on all of the pulleys, except for the
trim side spindle pulley. Carefully rotate the breaker
bar CLOCKWISE and install the belt on the trim side
spindle pulley. Carefully release the tension on the
breaker bar.
8. Reinstall the PTO drive belt.
WARNING
Use extreme caution when rotating the idler arm
with the breaker bar, due to the increased tension
in the spring as the idler arm is being rotated.
Injury may result if the breaker bar is prematurely
released while the spring is under tension.
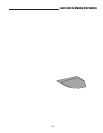
Figure 48. PTO Drive Belt Removal
A. Spring Loaded Idler Pulley
B. Stationary Idler Pulley
A
B
36