


Not for
Reproduction
49
Troubleshooting, Adjustment & Service
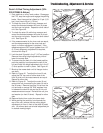
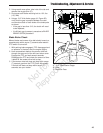
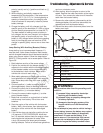
A
C
B
D
D
A
E
F
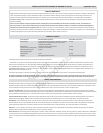
This hook-up is for negative grounded vehicles.
Callout Description
A
To Starter Switch
B
Starting Vehicle Battery
C
To Ground
D
Jumper Cable
E
Discharged Vehicle Battery
F
Engine Block
Make sure vehicles do not touch.
Figure 58. Jump Starting
WARNING
Any procedure other than the preceding could
result in:
(1) personal injury caused by electrolyte
squirting out the battery vents,
(2) personal injury or property damage due
to battery explosion,
(3) damage to the charging system of the
booster vehicle or of the immobilized
vehicle.
Do not attempt to jump start a vehicle having a
frozen battery because the battery may rupture
or explode. If a frozen battery is suspected,
examine all fill vents on the battery. If ice
can be seen or if the electrolyte fluid cannot
be seen, do not attempt to start with jumper
cables as long as the battery remains frozen.
polarity (usually red to [+] positive and black to [-]
negative).
5. While charging, periodically measure the
temperature of the electrolyte. If the temperature
exceeds 125° F (51.6° C), or if violent gassing or
spewing of electrolyte occurs, the charging rate
must be reduced or temporarily halted to prevent
battery damage.
6. Charge the battery until fully charged (until the
specific gravity of the electrolyte is 1.250 or higher
and the electrolyte temperature is at least 60° F).
The best method of making certain a battery is
fully charged, but not over charged, is to measure
the specific gravity of a cell once per hour. The
battery is fully charged when the cells are gassing
freely at low charging rate and less than 0.003
change in specific gravity occurs over a three hour
period.
Jump Starting With Auxiliary (Booster) Battery
Jump starting is not recommended. However, if it
must be done, follow these directions. Both booster
and dis-charged batteries should be treated carefully
when using jumper cables. Follow the steps below
EXACTLY, being careful not to cause sparks. Refer to
Figure 58.
1. Both batteries must be of the same voltage.
2. Position the vehicle with the booster battery
adjacent to the vehicle with the discharged battery
so that booster cables can be connected easily
to the batteries in both vehicles. Make certain
vehicles do not touch each other.
3. Wear safety glasses and shield eyes and face
from batteries at all times. Be sure vent caps are
tight. Place damp cloth over vent caps on both
batteries.
4. Connect positive (+) cable to positive post of
discharged battery (wired to starter or solenoid).
5. Connect the other end of same cable to same post
marked positive (+) on booster battery.
6. Connect the second cable negative (-) to other
post of booster battery.
7. Make final connection on engine block of stalled
vehicle away from battery. Do not lean over
batteries.
8. Start the engine of the vehicle with the booster
battery. Wait a few minutes, then attempt to start
the engine of the vehicle with the discharged
battery.
9. If the vehicle does not start after cranking for ten
(10) seconds, STOP PROCEDURE. More than
ten (10) seconds seldom starts the engine unless
some mechanical adjustment is made. Allow
a sixty (60) second cool down period between
starting attempts. Failure to follow these guidelines
can burn out starter motor.
10. After starting, allow the engine to return to idle
speed. Remove the cable connection at the engine
or frame. Then remove the other end of the same
cable from the booster battery.
11. Remove the other cable by disconnecting at the
discharged battery first and then disconnect the
opposite end from the booster battery.
12. Discard the damp cloths that were placed over the
battery vent caps.