


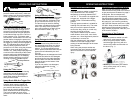

Fig. 18
Cleaning the Nozzles: If you notice that the
output pressure fluctuates, you may have to
clean the nozzles. Turn the unit "Off". Unplug
from electric outlet and disconnect the water
supply. Remove the lances, trigger gun and
hose from unit. Take the small metal pin
provided and insert into the nozzle end to
remove any obstructions. (Fig. 19)
Fig. 19
Hose Connector
Water Intake
This will occur more frequently if your
water supply is very hard.
Motor Thermostat
Important: This pressure washer is
equipped with a motor thermostat. The
motor will stop if it is overheating. Wait
10-20 minutes before starting the unit
again. If it stops again, please call
FANTOM customer service at
1 (800) 275-9251.
Ground Fault Circuit Interrupter
(GFCI)
This unit is equipped with a Ground
Fault Circuit Interrupter (
GFCI) built into
the plug. This device provides additional
protection from the risk of electrical
shock. When connecting the GFCI to the
electrical outlet, the indicator should
appear red. If the indicator is not red,
depress the RESET button on the GFCI
until the indicator appears red.
Cleaning Tips
Wood Decks: Rinse deck and
surrounding area with fresh water. If
using detergent, fill the detergent
applicator bottle and apply to the area
being cleaned. For optimal results,
reduce your work area to small sections
and clean each section one at a time.
Allow the detergent to rest on the surface
for a few minutes and then rinse at high
pressure. Do not let the detergent dry on
the deck. Always clean from left to right
and top to bottom for best results. Rinse
at high pressure using the fan jet keeping
the tip of the spray nozzle 8-12 inches
from the surface.
Caution: For soft
woods, increase the distance from the
cleaning surface.
Cars, Boats, & Motorcycles:
Wet down
area to be cleaned before applying
detergent with clean water. Fill the
detergent applicator bottle and apply to
the area being cleaned. To achieve best
results, clean one side at a time. Allow
the detergent to rest on the surface for a
few minutes but do not let it dry. Rinse at
high pressure using the fan jet in a
sweeping motion keeping the tip of the
spray nozzle at least 8-10 inches away
from the surface. Maintain a further
distance when using a direct spray. Wipe
surface for a polished finish.
8
GETTING TO KNOW YOUR PRESSURE WASHER OPERATING INSTRUCTIONS
Maintenance & Cleaning Winterizing & Long Term Storage
1. Disconnect all water connections.
2. Turn the pressure washer on for a
few seconds, until any remaining
water in the pump exits.
3. Turn the unit off immediately.
4. Store the pressure washer, parts and
accessories in an area with a
temperature above 32°F.
Lubrication: The pressure washer is
supplied with a closed lubrication system,
so no addition of oil is needed.
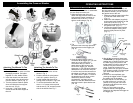
Checking the Water Intake Filter: The
water intake filter is located inside the water
intake connector. (Fig. 18). Remove
periodically and inspect for any deposits
that might accumulate there.
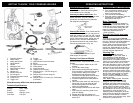
15. Trigger
16. Trigger Lock
17. High Pressure Hose Connector
18. Brush
19. High Pressure Hose
20. Rotary Brush
21. Hose Connector
22. Garden Hose Coupling
23. Phillips Screw 1 1/4–inch long (x1)
(not shown)
24. Phillips Screw 7/8-inch long (x2)
(not shown)
25. Phillips Screw 1-inch long (x1 nickel plate)
(not shown)
Storing Your Pressure Washer
1. Pressure Washer
2. Water Intake
3. Water Intake Filter
4. On/Off Switch
5. Handle
6. Detergent Tank
7. High Pressure Output
8. Power Cord
9. Wheels (x2)
10. Wheel Locks (x2)
11. Front Support
12. Pressure Regulated Lance
13. Turbo Lance
14. Trigger Gun
When you have finished using your
pressure washer, follow these steps for safe
storage:
1. Turn the pressure washer to the "Off"
position.
2. Turn off the water supply.
3. Before disconnecting the high pressure
hose connection, point the trigger gun in
a safe direction away from you and
discharge the high pressure water.
Disconnect the high pressure hose from
the pressure washer and trigger gun.
4. Disconnect garden hose from pressure
washer.
5. Remove excess water from the pump by
tipping the unit on both sides to drain
any remaining water from the water
intake and outlet fittings.
6. Drain detergent tank and flush with clean
water.
7. Wipe away any remaining water on all
parts and fittings.
8. Engage the trigger gun safety lock.
9. Store the unit and accessories in a room
above 32°F.
Illustrations may differ from actual product.
Technical Specifications
Voltage: 120V., 60Hz.
Power: 13 Amps
Pressure: 1900 psi. (max)
Flow Rate: 1.65 GpH
3