


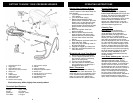
3. Once the high
pressure hose is
connected to the
unit, you can
attach the lance
to the end of the
trigger gun. (Fig. 4)
Fig. 3
Fig. 4
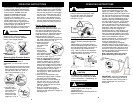
Once the pressure washer is
assembled, you are ready to use the
unit.
1. While facing the front side of the unit
attach the high pressure hose to the
high pressure output connector on
the right side of the unit. Twist on
tight to avoid leakage. (Fig. 3)
Once the high pressure hose is
attached to the pressure washer, you
can connect the garden hose to the
unit. Before attaching the garden hose
coupling to the unit, make sure that the
water intake filter is inside the water
intake connector on the unit.
1. Attach the male adapter (supplied) to
the water intake connector on the left
hand side of the unit. (Fig. 5)
2. Attach the female
hose coupling to
the garden hose.
(Fig. 5)
3. Connect the
female hose
coupling to the
male adapter making
sure that it is tightly
secured in place. (Fig. 5)
4. After all the connections have been
made and
BEFORE you plug the
pressure washer into an electrical
outlet, open the water supply and
press on the trigger switch in order to
remove any air which may be in the
hose or pump. Continue to press on
the trigger switch until you get a
constant flow of water coming out of
the trigger gun. Allow water to flow
for 30 seconds.
5. Once this is accomplished, stop
pressing the trigger switch. Engage
the safety lock on the trigger.
6. Ensure that the "On/Off" switch, at
the rear of the unit, is on the "Off"
position, then plug the unit into an
electrical outlet and turn the unit to
the "On" position.
7. Now you are ready to use the
pressure washer. Disengage the
safety lock and depress the trigger on
the trigger gun.
Fig. 5
OPERATING INSTRUCTIONSOPERATING INSTRUCTIONS OPERATING INSTRUCTIONSOPERATING INSTRUCTIONS
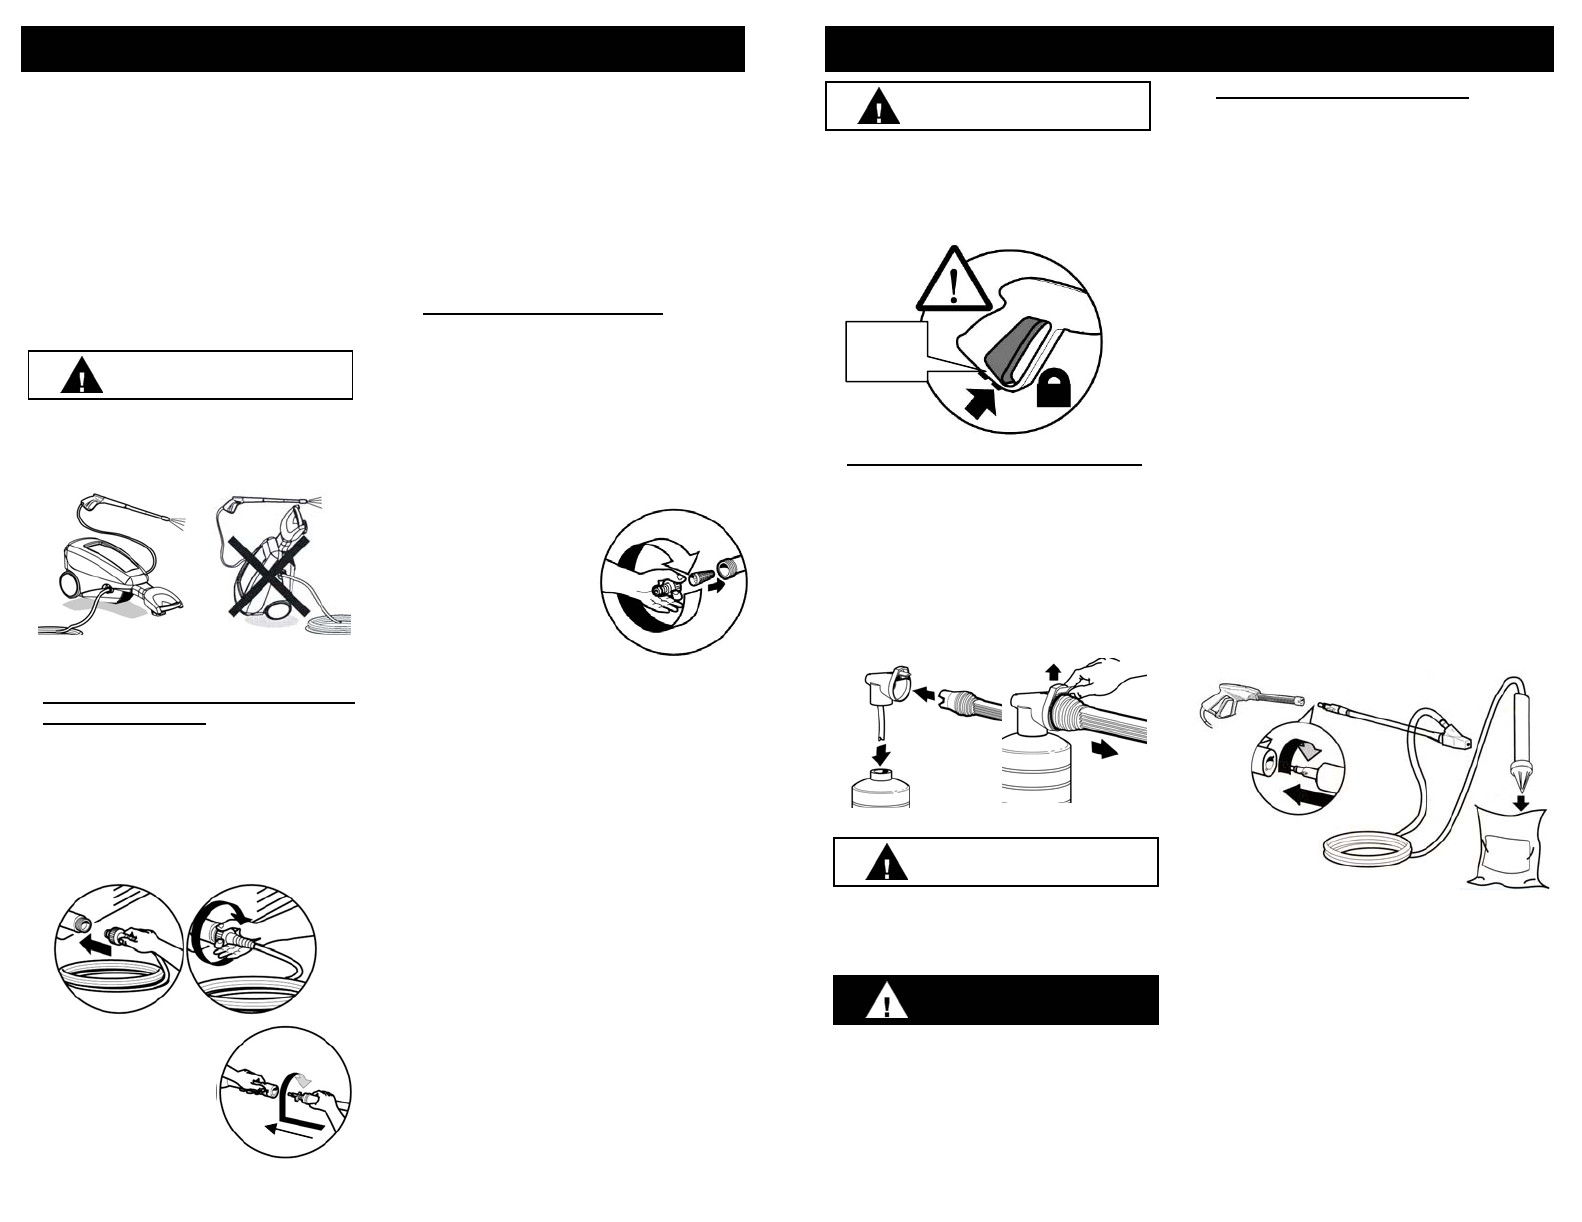
Using the Sandblasting Kit
CAUTION
attributable to air bubbles in the water
or other similar phenomena which do
not imply the existence of any defects
in the machine. Do
NOT leave the
appliance unattended during the
standby for more than 5 minutes.
Contrarily, for the safety of the
appliance it is necessary to re-turn the
On/Off switch to the “Off” position.
Please check that the coupling of the
high pressure hose with the appliance
and the trigger gun supplied as
standard equipment is made correctly,
that is to say without any water leak.
To attach the lance to the trigger gun,
hold the trigger gun in your left hand
insert the lance and push it in all the
way into the connector on the trigger
gun and turn it clockwise 60° until it
locks in place. To remove the lance,
push down on the attachment and
turn counter-clockwise 60° and then
pull out. Make sure that the lance is
securely locked in place before use.
5
Attaching High Pressure Hose to
Pressure Washer
Garden Hose Connection
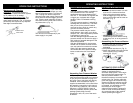
CAUTION
When using your pressure washer,
always have it in the horizontal
position as shown below.
NEVER
have it in the upright position.
CORRECT WRONG
Fig. 6
Safety
Lock
Fig. 7
Fig. 8
Using the High Pressure Lance
The high pressure lance may be used
alone or with the detergent applicator
bottle.
Add detergent to the bottle and then
attach the detergent applicator bottle to
the high pressure lance, just push it on
the end of the high pressure lance.
(Fig. 7 & 8) To remove the detergent
applicator bottle, lift the tab on the top
of the connector and pull off.
CAUTION
Fig. 9
To use the sandblast attachment,
connect the sandblasting lance to the
trigger gun, hold the trigger gun in your
left hand insert the lance and push it in all
the way into the connector on the trigger
gun and turn it clockwise 60° until it locks
in place. Once the sandblasting lance is
attached, place the sandblasting probe
into the container of sand. (Fig. 9) Make
sure that when using the sandblasting
lance, the delivery hose is facing up as in
the illustration below. If the hose is facing
downward, water will enter the tool,
wetting the sand and clogging the
sandblasting lance. If this happens, you
must let the sand and the sandblasting
lance dry thoroughly before using again.
To remove the sandblasting lance, push
down on the attachment and turn
counter-clockwise 60° and then pull out.
Make sure that the lance is securely
locked in place before use.
To begin sandblasting, disengage
handgrip safety and pull trigger as you
would for pressure washing with water. It
is recommended that a trial work-piece
be used in order to familiarize the user
with the operation and effectiveness of
the sandblast attachment.
Note: Use either clean, dry sand or
glass bead no larger than grit 10 .
When you wish to stop using the
pressure washer temporarily, make
sure that the safety lock has been
engaged to avoid any accidental
operation. (Fig. 6)
Do NOT use the sandblasting kit on
vinyl siding or soft materials. Do
NOT
use on wood decks. Sandblasting will
damage these surfaces.
IMPORTANT: Insert the sandblasting
probe into sand leaving top at least 2-
inches above the sand. If the probe is
totally submerged, the unit will not
draw sand.
DANGER
Always wear protective clothing and
safety goggles when using the
sandblasting kit.
Never point the sandblasting lance at
people or animals.
6