


Maintenance
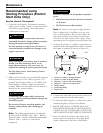
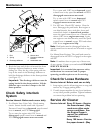
4. Thoroughly clean the area around each of the
charge pump housings.
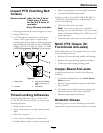
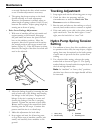
5. To “prime” charge pump, loosen two hex socket
head capscrews (shown in
Figure 14) 1 1/2 turns
only. Make sure engine is not running. Lift
the charge pump housing upward and wait for
a steady ow of oil to ow out from under the
housing. Retighten the capscrews. Do this for
both pumps.
Note: Hydraulic reservoir can be pressurized up
to 5 psi to speed this process.
6. If either drive wheel still does not rotate, stop
and repeat steps 4 and 5 above for the respective
pump. If wheels rotate slowly, the system may
prime after additional running. Check oil level
as stated in Check the Hydraulic Oil Level
section.
7. Allow unit to run several minutes after the charge
pumps are “primed” with drive system in the full
speed position. Check oil level as stated in Check
the Hydraulic Oil Level section.
8. Check hydro drive linkage adjustment as stated in
Hydro Drive Linkage Adjustment section in
Adjustments.
Replace Emissions Air Intake
Filter
Service Interval: Every 500 hours
1. Stop engine, wait for all moving parts to stop, and
remove key or spark plug wire(s). Engage parking
brake.
2. Remove the lter from the vent hose.
3. Insert a new lter into the end of the vent hose.
Wheel Hub-Slotted Nut
Torque Specication
Service Interval: After the rst 100 hours
Every 500 hours thereafter
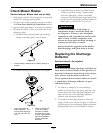
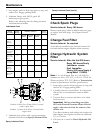
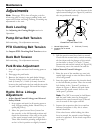
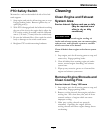
See Figure 15 to determine which slotted nut has
been installed on the unit.
Figure 15
1. Style A (black nish) 3. Style B (yellow zinc)
2. .03 inch (.76 mm) 4. .24 inch (6 mm)
• Style A (black nish):
Torque the slotted nut to 140-155 ft-lb (190-210
N-m).
Note: Do Not use anti-seize on wheel hub.
• Style B (yellow zinc):
1. Remove and discard the cotter pin.
2. Torque the slotted nut to 100 ft-lb (136 N-m).
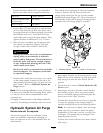
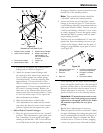
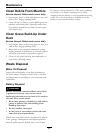
3. Check distance from bottom of slot in nut to
inside edge of hole. Two threads (0.1 inch) or
less should be showing.
Figure 16
1. 0.1 inch max 2. No more than two
threads (0.1 inch max)
should be showing here.
4. If more than two threads (0.1 inch) are
showing remove nut and install washer (P/N
1-523157) between hub and nut.
5. Torque the slotted nut to 100 ft-lb (136 N-m).
6. Then tighten nut until the next set of slots line
up with the cross hole in shaft. Do Not loosen
nut to align the slot. If required, tighten to
the next set of slots.
7. Install new cotter pin (P/N 1-806800).
Note: Do Not use anti-seize on wheel hub.
32