


Maintenance
Periodic Maintenance
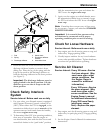
Check Engine Oil Level
Service Interval: Before each use or daily
1. Stop engine and wait for all moving parts to stop.
Make sure unit is on a level surface.
2. Check with engine cold.
3. Clean area around dipstick. Remove dipstick and
wipe oil off. Reinsert the dipstick and push it all
the way down into the tube. Do Not screw into
place. Remove the dipstick and read the oil level.
4. If the oil level is low, wipe off the area around the
oil ll cap, remove cap and ll to the “FULL”
mark on the dipstick. Use oil as specied in
Engine Owner’s Manual. Do Not overll.
Important: Do Not operate the engine with the
oil level below the “LOW” (or “ADD”) mark on
the dipstick, or over the “FULL” mark.
Check Mower Blades
Service Interval: Before each use or daily
1. Stop engine, wait for all moving parts to stop, and
remove key. Engage parking brake.
2. Lift deck and secure in raised position as stated
in the Clean Grass Build-Up Under Deck
procedure.
3. Inspect blades and sharpen or replace as required.
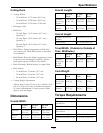
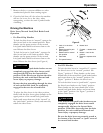
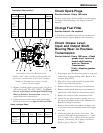
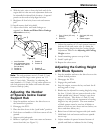
4. Re-install the blades (if they were removed) and
torque blade bolts to 75-80 ft-lb (102-109 N-m).
Be sure the spring disc washer cone is installed
toward the bolt head (see
Figure 8).
Figure 8
1. Spring disc washer (cone towards bolt head)
2. Blade bolt torque to 75-80 ft-lb (102-109 N-m).
Replacing the Discharge
Deector
Service Interval: As required
DANGER
An uncovered discharge opening could allow the
lawn mower to throw objects in the operator’s or
bystander’s direction and result in serious injury.
Also, contact with the blade could occur.
Never operate the lawn mower unless you install
a mulch plate, discharge deector, or grass
collection system.
1. To remove a damaged or worn discharge
deector, lift the leg of the spring with the loop
out of the notch in the discharge deector and
slide the rod out of the discharge deector
brackets, and discharge deector.
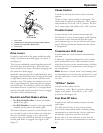
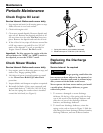
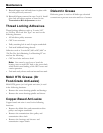
2. To install new discharge deector, orient the
spring on the rod as shown in Figure 9. Slide the
rod through the front discharge deector bracket,
discharge deector, and rear deector bracket.
20