


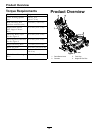


Operation
PTO Engagement
DANGER
The rotating blades under the mower deck are
dangerous. Blade contact can cause serious
injury or kill you.
Do Not put hands or feet under the mower or
mower deck when the blades are engaged.
DANGER
An uncovered discharge opening will allow
objects to be thrown in an operator’s or
bystander’s direction. Also, contact with the
blade could occur. Thrown objects or blade
contact can cause serious injury or death.
Never operate the mower with the discharge
deector raised, removed, or altered unless there
is a grass collection system or mulch kit in place
and working properly.
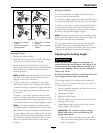
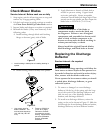
The PTO switch engages the cutting blades. Be sure
that all persons are clear of mower deck and discharge
area before engaging the PTO.
1. Set throttle to “MIDWAY” position.
2. Push the PTO engagement arm forward and
down to engage blades.
3. Place the throttle in the “FAST” position to begin
mowing.
For manual start engines: The park brake must
be disengaged before the PTO is engaged or the
engine will kill.
Disengaging the PTO
1. Set throttle to “MIDWAY” position.
2. Pull upward and back completely on the PTO
engagement arm to disengage the blades.
Stopping the Engine
1. Bring the unit to a full stop.
2. Lock drive levers in neutral.
3. Disengage the PTO.
4. Move speed control lever to neutral.
5. Engage the parking brake.
6. Place the throttle midway between the “SLOW”
and “FAST” positions.
7. Allow the engine to run for a minimum of 15
seconds, then turn the ignition switch to the
“OFF” position to stop the engine.
8. Remove the key to prevent children or other
unauthorized persons from starting engine.
9. Close the fuel shut-off valve when the machine
will not be in use for a few days, when
transporting, or when the unit is parked inside
a building.
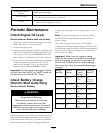
Driving the Machine
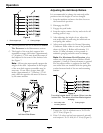
Drive Lever/Neutral Lock Latch Operation
To lock the drive levers in “neutral lock”, squeeze the
drive levers to the “neutral” position (Do Not squeeze
the drive levers all the way back as this will cause the
drive wheels to go into full reverse direction). See
Figure 5 position 1. Place thumbs on the inner lobe
of the neutral lock latches and rotate them under
the drive levers into the “neutral lock” position. See
Figure 5 position 2. Release the drive levers.
CAUTION
If the neutral lock latches are not completely
engaged the drive levers could unexpectedly slip
into the forward drive position. If the drive levers
slip into the drive position the unit could lurch
forward and cause injury or property damage.
Be sure the drive levers are past the roller and
securely seated at the bottom of the neutral lock
latches.
To place the drive levers in the “forward” position,
slightly squeeze the drive levers while placing thumbs
on the outer thumb lobe of the neutral lock latches
(or the index nger on the front lobe) and rotate them
from under the drive levers. Slowly and carefully
release the drive levers. See Figure 5 position 3.
To place the drive levers in the “reverse” position,
squeeze the drive levers past the neutral position. See
Figure 5 position 4.
20