


Operation
Note: On the 42 and 52 inch decks, the discharge
bafe does not have to be removed from the deck;
you may notice better discharge with it installed.
If removed, replace the original hardware in the
deck holes.
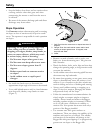
Replacing the Discharge
Deector
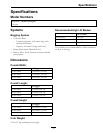
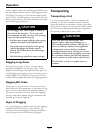
1. Locate items shown in Figure 7.
Figure 7
1. Rod 4. Mower deck
2. Spring 5. Discharge deector
bracket
3. Discharge deector
6. Assembled view
2. Place the discharge deector on the deck.
3. Orient the spring so that the short leg points
towards the discharge deector and the longer
leg points towards the deck as shown in Figure 7.
Place spring on rod and slide rod, straight end,
through the front discharge deector bracket,
discharge deector, and rear deector bracket.
4. Make sure that the spring and rod are installed so
that the rod is retained from sliding out by the
front bracket and the spring holds the discharge
deector in the down position. Refer to (Figure 7)
for proper orientation.
Important: The discharge deector must be
spring loaded in the down position. Lift the
deector up to test that it snaps to the full
down position.
Installing the Bagger
1. Move the motion control levers outward to
neutral position, disengage the power take off
(PTO), engage parking brake, stop the engine,
remove the key, and wait for all moving parts to
stop before leaving the operating position.
2. Slide the rod out of the short stand-off, spring,
and discharge deector. Remove the discharge
deector (see Figure 7).
3. Install the hood assembly onto the hitch.
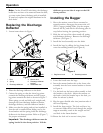
4. Install the bags by sliding the bag frame hook
onto the retaining bracket (see Figure 8).
Figure 8
1. Bag frame hook
2. Retaining bracket
5. Lower the hood onto the bags.
6. Insert the mount bracket tab on the lower tube
assembly into the boot mount bracket as shown
in Figure 6.
7. Use the latch on the lower tube assembly to lock
the bracket to the deck. Adjust the tension on
the latch to hold the bracket up to the deck, yet
allow for release by hand.
8. Slip the upper exible tube into junction tube of
the hood opening.
9. Install the front weight. The lock rod has a key
on one end. Slide the lock rod through the weight
support assembly, notch in the weight and the
oval hole in the frame bracket.
10. Rotate the lock rod to secure it into place.
12