


4 BASIC OPERATIONS
7
G1000A OPERATION MANUAL
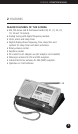
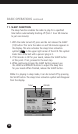
1. BATTERIES
Remove the battery compartment cover by pushing it in the
direction of the arrow. Install two ‘AA’ batteries according to the
polarity symbols (+ and -) marked next to the compartment.
For easy removal, place the batteries on top of the lift-out ribbon.
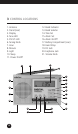
2. POWER ON/OFF/VOLUME
Turn the radio on by switching the power on/off switch (11).
Use the volume knob (21) to adjust the volume.
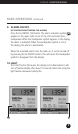
3. FM RADIO
Select the FM band by using the band selector switch (13).
Use the tuning knob (6) to tune the radio to the desired frequency.
When a strong signal is found, the TUNE indicator will light.
If you are using an earphone to listen to FM stereo, the
FM ST. LED (5) will light. Note that the frequency of the station
appears in the display (3).
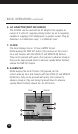
4. AM/SW1-8 RADIO
Select the desired band, AM or SW 1-8, by using the band selector
switch (13). Turn the tuning knob (6) to the desired frequency \
which appears in the display (3) or just tune around and listen for
stations. Note that MW appears in the display when AM is
seleced. That’s because the AM band is called MW (for medium
wave) in some parts of the world. SW appears in the display when
SW 1-8 is selected.
5. ANTENNA
A. For AM (MW) the radio uses an internal, directional, ferrite bar
antenna. Rotate the radio for best reception.
B. For FM/SW, fully extend the telescopic antenna (1). For FM,
rotate it for best reception.