


23
6 8
2
9
3
2 10
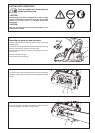
STOP
2
4
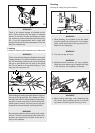
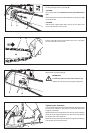
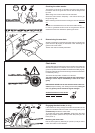
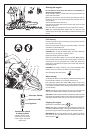
Pull the chain (6) around the sprocket nose (8) of the guide
bar in the direction of the arrow.
Replace the sprocket guard (3).
IMPORTANT:
Lift the saw chain over the chain catcher (9).
Tighten the nuts (2) only hand-tight to begin with.
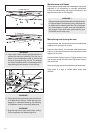
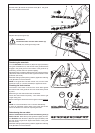
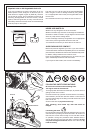
Tensioning the saw chain
Turn the QuickSet chain tensioner (10) to the right (clockwise)
using the combination tool, until the saw chain guide elements
engage in the guide groove on the bottom of the guide bar (if
necessary, pull the chain into position slightly).
Raise the tip of the guide bar slightly and turn the chain tensioner
(10) further until the saw chain is ush against the bottom of the
guide bar (see circle).
While still holding up the tip of the guide bar, tighten the retaining
nuts (2) with the universal wrench.
NOTE: If the guide bar has been turned over, turn the chain
tensioner to left (i.e. counter-clockwise) to tighten the chain.
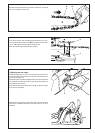
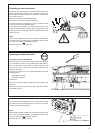
Checking the chain tension
The tension of the chain is correct if the chain rests against
the bottom side of the guide bar and can still be easily turned
by hand.
While doing so the chain brake must be released.
Check the chain tension frequently - new chains tend to get
longer during use!
When checking the chain tension the engine must be switched
off.
NOTE: It is recommended to use 2-3 chains alternatively.
In order to guarantee uniform wear of the guide bar the bar
should be turned over whenever replacing the chain.
Retensioning the saw chain
Use the combination tool to loosen the fastening nuts (2)
about one turn. Raise the tip of the guide bar slightly and turn
the QuickSet chain tensioner (10) to the right (clockwise) until
the saw chain is again ush against the bottom of the guide
bar (see circle).
While still holding up the tip of the guide bar, tighten the retaining
nuts (2) with the universal wrench.