


6
MULCHING TIPS
In the mulching configuration your new mower is designed to re-cut the grass
clippings into short lengths.
These clippings, which are dispersed as you mow will biodegrade quickly and
provide nutrients for the lawn.
• Set mower at highest cutting height when mowing in rough ground or in tall
weed.
• Avoid cutting the lawn when it is wet. Wet grass tends to form clumps with
the mulching action. The best time to cut your lawn is in the afternoon.
• For best results, adjust the lawnmower cutting height so that the lawnmower
cuts off only the top third of the grass blades.
• If your lawn is overgrown it may be necessary to increase the cutting height
to reduce the pushing effect and prevent overloading the motor.
• For extremely heavy mulching make narrower cuts and mow slowly.
• Change your cutting pattern from week to week. Mow north to south one
week and east to west the next week. This will help prevent matting and
graining of the lawn.
DISCHARGING (AVAILABLE AS AN OPTION AT EXTRA COST)
The mower, with optional discharge chute, can be used to discharge grass
clippings back to the lawn.
1. Discharging may be necessary if the grass is too long to mulch or the bag
fills too quickly.
2. Clippings may be further dispersed, if needed, by blowing them with a
yard blower.
3. In heavy grass conditions, a narrower pass may be required
BAGGING
It is recommended to bag the clippings for the first few spring mowings and
the last mowing of the season to discourage diseases.
1. Bagging the clipping is sometimes preferred to reduce tracking of
clippings into pools, hot tubs, and homes.
2. Clippings can be added to your compost bin and used later for a natural
fertilizer.
Before each mowing session unplug the mower and ensure that the blade has
stopped. Check all nuts, bolts and screws to ensure proper tightness, Be sure to
check the blade fastening system.
IMPORTANT:
To assure product SAFETY and RELIABILITY, repairs,
maintenance and adjustment (including brush inspection and replacement)
should be performed by SEARS Service Centres or other qualified service
organizations, always using Sears replacement parts. When servicing use
ONLY IDENTICAL REPLACEMENT PARTS
.
Inspect and thoroughly clean your mower at the beginning of each mowing
season for longer life and better performance.
From time to time turn the mower off and wait for the blade to stop. Then
unplug the power cord and turn the mower on its side. Using an object such
as a stick or rag, wipe out any accumulation of grass in the blade area. Also
clean out any grass or debris which may be packed around the
discharge/mulch door area. Be careful of the sharp edges of the blade.
MAINTENANCE
OPERATION
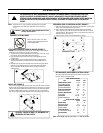
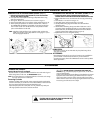
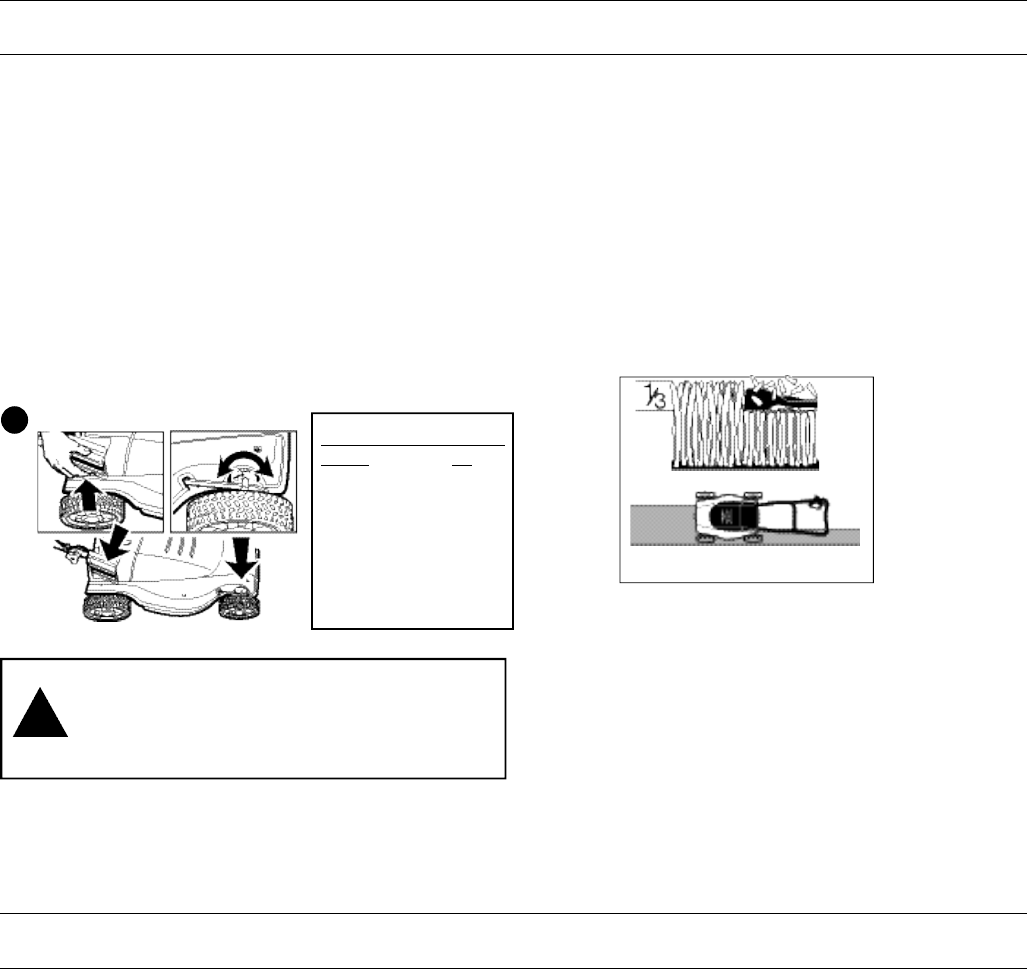
WHEEL HEIGHT ADJUSTMENT (FIGURE 8)
1. BEFORE MAKING ANY ADJUSTMENTS, TURN OFF, UNPLUG MOWER
AND WAIT FOR BLADE TO STOP.
2. Your mower features the Sears one touch wheel height
adjustment system. This system will adjust all four wheels at the same time.
3. To raise or lower the cutting height. See Figure 8. Rest the palm of your
hand on the palm rest and with your fingers, squeeze upward on the
finger grip and hold.
4. While holding the finger grip up you can raise or lower the cutting height.
The mulcher has eight blade height adjustment positions. Refer to the scale
and pointer (see Figure 8) at the front of the mower. The pointer will give
you the height setting for cutting your lawn. This setting can be a
reference for the next time you want to cut your lawn at the same height.
When you have the mulcher at the height you would like, simply release
the finger grip to lock the height adjust.
Note: To ensure that the deck is securely locked in one of the eight
positions, press down on the palm rest after releasing the finger
grip.
8
CUTTING HEIGHT POSITIONS
Position Cut
1 (LOW) 1-1/4”
2 1-1/2”
3 1-3/4”
4 2”
5 2-1/2”
6 3”
7 3-1/4”
8 (HIGH) 3-1/2”
CAUTION: DO NOT ATTEMPT TO UNCLOG THE BLADE
CHAMBER BY DROPPING OR TAPPING THE TOOL ON THE
GROUND. THIS CAN DAMAGE THE UNIT. KEEP HANDS
CLEAR OF BLADE WHEN CLEANING.
!