


12
106815
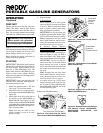
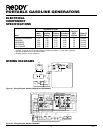
PORTABLE GASOLINE GENERATORS
®
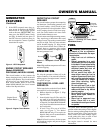
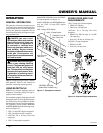
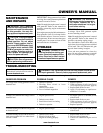
Figure 23 - Engine Switch In ON Position
(All Models Except RGH3000PR,
RGH5500AIE, RGH7500AIE, and
RGH11000AIE
ENGINE SW
ON
OFF
Fuel Valve Lever (ON Position)
Choke Lever (Closed Position)
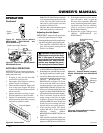
Figure 19 - Fuel Valve Lever On, Choke
Lever Closed (Model RGH5500A Shown)
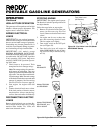
Figure 21 - Choke Button Closed (Model
RGH11000AIE Only)
Choke Button
Pulled Out
(Closed Position)
Figure 20 - Choke Rod Closed (Model
RGH3000PR Only)
Choke Rod
Pulled Out
(Closed
Position)
Figure 22 - Engine Lever In ON Position
(Model RGH3000PR Only)
OPERATION
Continued
PRESTART
Operate generator on a firm, dry, and clean
surface. The surface must be level. Protect
generator from heavy dust, sand, dirt, rain, or
snow. Do not locate generator near standing
water and snow. Make sure area is well vented.
WARNING: Only responsible
adults should use generator.
Never let anyone operate genera-
tor without proper instructions.
Note:
If oil level is too low, oil alert system
will keep engine from starting (see Oil Alert
System, page 6). Make sure oil level is full
before starting. See Engine Oil, page 7.
Before starting the engine, disconnect all
electric loads from generator.
STARTING
IMPORTANT:
The engine speed is preset.
The throttle is locked in preset position. Do
not adjust throttle. Preset position lets en-
gine run at 3600 RPM under load. The
engine must maintain 3600 RPM for gen-
erator to create correct voltage. Running
engine at lower speeds will damage genera-
tor and powered items.
IMPORTANT:
Never start generator with
electrical loads connected. Start engine be-
fore adding electrical loads.
1. Make sure gasoline tank is full. See
Fuel, page 7 for fuel information.
2. Move fuel valve lever to the ON posi-
tion except on Model RGH3000PR (see
Figure 19).
3. Move choke lever fully to the left for
all models except RGH3000PR or
RGH11000AIE (see Figure 19). Pull
choke rod out for Model RGH3000PR
(see Figure 20) or choke button out for
Model RGH11000AIE (see Figure 21).
This closes the choke.
Note:
You may not need to close
choke if engine is warm or air tem-
perature is high.
4. Start the engine.
A. Recoil Starter
Move engine lever or turn engine
switch to the ON position (see Figures
22 and 23). Remove slack from starter
rope by lightly pulling starter grip.
Next, pull starter rope briskly.
IMPORTANT:
Do not let starter grip
snap back against engine. Return it gen-
tly. This will prevent damage to starter.
Note:
If engine does not start, check
the oil in the crankcase. Add oil as nec-
essary. Be sure engine is on a level sur-
face. See Oil Alert System, page 6.
B. Electric Starter (Models
RGH5500AIE, RGH7500AIE, and
RGH11000AIE Only)
Turn the engine switch to the START po-
sition (see Figure 24, page 13). Hold it
there until engine starts. When engine
starts, let switch return to the ON position.
IMPORTANT:
Do not use electric
starter more than five seconds. Starter
motor damage may occur. If engine
fails to start, release the switch and wait
ten seconds. After ten seconds, try start-
ing again.
Note
: If engine does not start, check
the oil in the crankcase. Add oil as nec-
essary. Be sure engine is on a level sur-
face. See Oil Alert System, page 6.
5. As engine warms up, slowly move
choke lever fully to the right (see Fig-
ure 25, page 13). This opens the choke.
On Model RGH11000AIE, the choke
will automatically open.