ASSEMBLY PROCEDURE
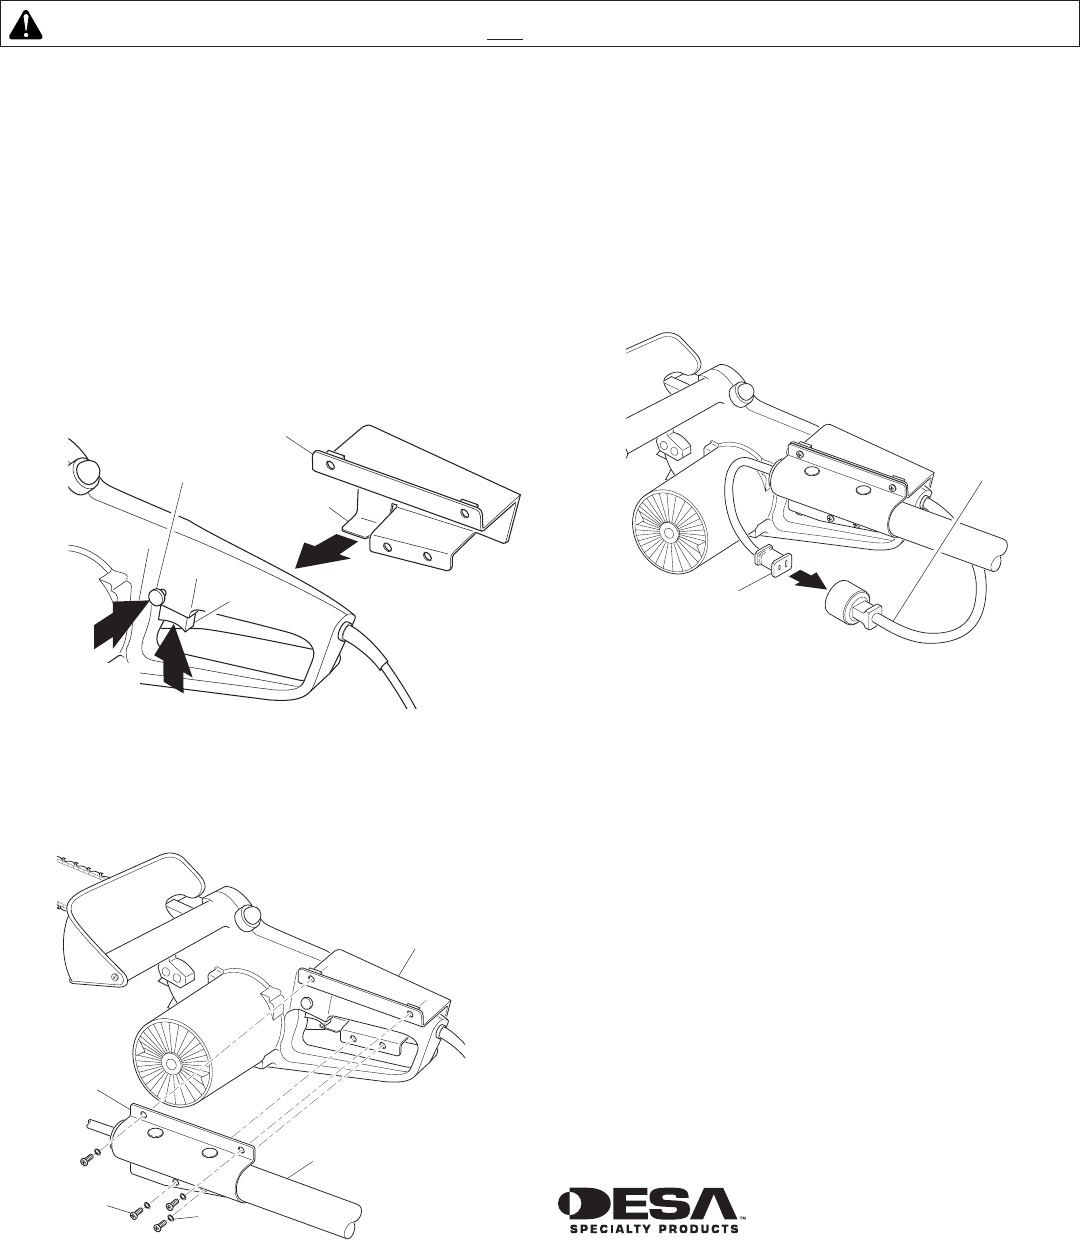
1. Push in and hold trigger lockout button. Squeeze and hold trigger. (see Figure 1, Steps 1 and 2)
2. Continue to hold trigger while sliding the handle bracket onto chain saw handle (see Figure 1, Step 3). The
trigger support on the bracket will hold the trigger in the “ON” position (see Figure 2).
3. Attach pole assembly to chain saw. Align the holes in the pole bracket and handle bracket. Using four Philips
head screws and lock washers provided, insert screws through lock washers and holes in pole bracket. Tighten
screws securely with screwdriver into weld nuts of handle bracket (see Figure 2).
4. Plug chain saw power cord into receptacle end of pole assembly power cord (see Figure 3).
Figure 1 - Attaching Handle Bracket to Chain
Saw Handle
Step 3 - Slide Handle Bracket onto Chain Saw
Handle.
Note:
Verify Trigger Support is Under the
Trigger and the Trigger is in the “ON” Position.
POLE SAW ASSEMBLY
Pole/Bracket Replacement Kit - 110731R
Figure 2 - Attaching Pole Saw Bracket to
Handle Bracket
Figure 3 - Connecting Chain Saw Power Cord
to Pole Assembly Power Cord
111006-02
Rev. A
02/04
P.O. Box 90004
Bowling Green, KY 42102-9004
U.S.A.
www.desatech.com
TECHNICAL SERVICE
You may have further questions about assembling, operating,
or maintaining this product. If so, you can visit our Technical
Service web site at www.desatech.com or contact our Tech-
nical Service Department at 1-800-858-8501 (English Only),
7:30 AM to 4:30 PM CST (M-F). You may also write to:
DESA Specialty Products™
P.O. Box 90004, Bowling Green, KY 42102-9004
ATTN: Technical Service Specialty Products
When contacting DESA Specialty Products™, have ready
•Your Name
•Your Address
•Your Phone Number
• Model Number of Product
•Date of Purchase (Include copy of receipt for written requests).
Handle Bracket
Pole Assembly
Pole Bracket
Philips Head
Screw (4)
Lock
Washer (4)
WARNING: Verify both saw and pole are not connected to power source before assembly.
1
3
2
Handle Bracket
Trigger Support
Lockout Button
Step 2 - Depress Trigger
Trig-
Step 1 - Push In
Lockout Button
Pole Assembly Power
Cord Receptacle
Chain Saw
Power Cord


