


5
As s emb ly I nstructions
NOTE: Assembly of this heater requires basic mechanical skills. Proper assembly is the responsibility of
the installer.
STEP 1
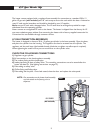
Remove all individual components from all cartons. Dispose
of the remaining packaging.
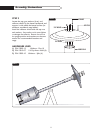
STEP 2
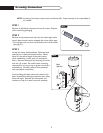
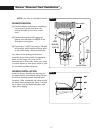
Remove one protective end cap from the intake pipe, make
certain pipe threads remain wrapped with white teflon tape.
• Do not tape over the first two threads at the of the intake
pipe (fig. 01)
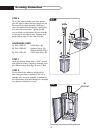
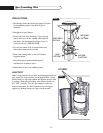
STEP 3
Locate the heater head assembly. Place the head
assembly on a stable horizontal surface. Please
allow for the entire length of the patio heater
when establishing a work area (i.e. workbench,
floor). Remove valve panel by removing the knob
then the (4) screws. Be careful when removing
valve panel so as not to tug on igniter wire that is
still attached. Carefully remove wire, (attached
with a push/pull connection).
Firmly holding the safety valve with channel lock
pliers, thread the intake pipe clockwise into safety
valve until tight. Reattach the valve panel and
continue to step 4 to attach the post assembly.
FIG.01
Dynamic Co
oking Systems, Inc.
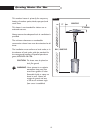
FIG.02
Match
Light Cover