


17
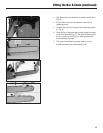
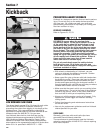
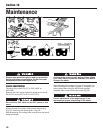
Now, make your felling cut on the opposite side of the
trunk. Start the cut about 4-5 cm (2”) higher than the
center of the notch (3 - Fig. 30).
Always leave a hinge (A, Fig. 31 and 32) which allows you
to control the direction the tree falls in. Put a wedge into
the felling cut, before the tree starts to move, to prevent
the chain saw guide bar from getting stuck.
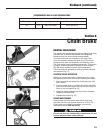
If the diameter of the trunk is greater than the length of
the guide bar, make the felling cut as shown in the
sequence of Fig. 32.
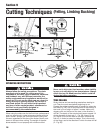
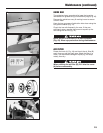
LIMBING
a) Always start from the larger diameter and move towards
the tip to cut off limbs and any secondary branches.
b) Always find the safest and most stable position
before accelerating the chain saw. If necessary, keep
your balance by resting your knee on the trunk itself.
Make sure your knee is positioned far away from the
saw chain and cutting area.
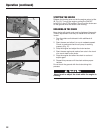
c) Keep the chain saw on the trunk so as not to get too
tired, turning it onto the left- or right-hand side
depending on the position of the branch to cut (Fig. 33).
d) When branches are under tension, find a safe
position to protect yourself in case the branches
whip back. Always start the cut from the opposite
side to the bend.
When cross-cutting, do not use the upper edge of the
guide bar tip; use the middle portion of the bar. Using
the tip when cross-cutting may lead to kickback.
Wear eye protection during maintenance.
Cutting Techniques (continued)
34
33
36
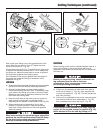
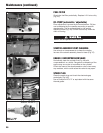
BUCKING
When bucking up the trunk to desired lengths, there is a
basic rule to follow. Look to see where the trunk is
supported, and determine which way the two halves will
fall when cut.
Before you begin bucking, check underneath the
log and make sure the area is free from
obstructions. Also, use extreme caution when
performing bucking techniques.
a) If the trunk is supported at both ends, first make a
small cut at the top (1 - Fig. 34), then complete the
cut from the bottom (2 - Fig. 34). This will prevent the
saw from pinching.
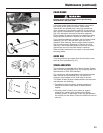
b) If the trunk is supported at one end or near the center,
first make a small cut from underneath (1 - Fig. 35),
then complete the cut from the top (2 - Fig. 35).
If the saw becomes pinched in the trunk, stop the
engine, lift the log and change its position (Fig. 36).
Never attempt to free the saw by pulling on it.
35