


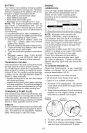

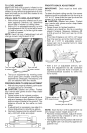
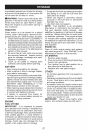
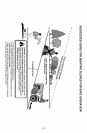

4. FirstconnectREDbatterycable(B)to
positive(+)batteryterminalwithhex
boltandkepsnutasshown.Tighten
securely.Slideterminalcover(C)over
terminal.
5. ConnectBLACKgroundingcableto
negative(-)batteryterminalwithre-
maininghexboltandkepsnut.Tighten
securely
6. Closehood.
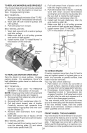
i Negative
(Black)
Cable
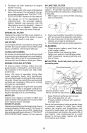
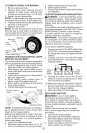
TO REMOVE HOOD & GRILLASSEMBLY
1. Raise hood.
2. Unsnap headlight wire connector.
3. Stand in front of tractor. Grasp hood at
sides, tilt toward engine and lift off of
tractor.
4. When replacing hood, be sure to re-
connect the headlight wire connector.
Headlight Wire
Connector
Positive
(Red)
Cable
TO REPLACE HEADLIGHT BULB
1. Raise hood.
2. Remove bulb holder from the hole in
the backside of the grill.
3. Replace bulb in holder and install bulb
holder securely back into the hole in
the backside of the grill.
4. Close hood.
INTERLOCKS AND RELAYS
Loose or damaged wiring may cause
your tractor to run poorly, stop running, or
prevent it from starting.
• Check wiring. See electrical wiring
diagram in the Repair Parts manual.
TO REPLACE FUSE
Replace with 20 amp automotive-type
plug-in fuse. The fuse holder is located
behind the dash.
ENGINE
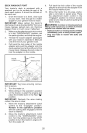
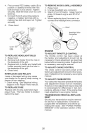
TO ADJUST THROTTLE CONTROL
The throttle control has been preset at
the factory and adjustment should not be
necessary Check adjustment as described
below before loosening cable. Ifadjustment
is necessary, see engine manual.
TO ADJUST CHOKE CONTROL
The choke control has been preset at the
factory and adjustment should not be neces-
sary. If adjustment is necessary, see engine
manual.
TO ADJUST CARBURETOR
Your carburetor has been preset atthe factory
and adjustment should not be necessary.
However, minor adjustment may be required
to compensate for differences in fuel, tem-
perature, altitude or load. Ifthe engine does
need adjustment, see engine manual.
TRANSMISSION REMOVAL/REPLACE=
MENT
Should your transmission require removal
for service or replacement, it should be
purged after reinstallation and before op-
erating the tractor. See "PURGE TRANS-
MISSION" in the Operation section of this
manual.
26