


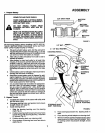

1. Prepare Battery
WEAR EYE AND FACE SHIELD.
WASH HANDS OR CLOTHING IMMEDI-
ATELY IF ACCIDENTALLY IN CONTACT
WITH BATrERY ACID.
_ DO NOT SMOKE. FUMES FROM
CHARGED BATTERY ACID ARE EX-
PLOSIVE
READ THE INSTRUCTIONS INCLUDED
WITH THE BATTERY VENT CAPS IN
THE BAG OF PARTS. ALWAYS WEAR
GLOVES, CLOTHING AND GOGGLES
TO PROTECT YOUR HANDS, SKIN AND
EYES.
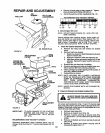
Filland charge battery (before installing).NOTE: SEE DE-
TAILED INSTRUCTIONS PACKAGED WITH BATTERY
VENT CAPS FOUND IN BAG OF PARTS.
a. Filleach celt with battery acid, Add the acid untilit
reachesthe bottomof theventtubes (Fig.I)° Do not
add the acid beyond thislevel orthe additional acid
can come outwhen thebattery is charged.,
bo Alter cells are filled, tiltbattery from sideto sideto
release air bubbles°
c. Allowbattery to stand and settlefor at least thirty
minutes. Ifthe levelof acid fallsbelow the pointde-
scribedin step (a), add more acid untilthe correct
level is reached°InstaUthebatterycaps,foundinthe
bag ofparts,to cover the venttubes°Washthetopof
the batterywithwaterto removeany acid, thenwipe
dry.
d. Checkbatterycase forleakageto makesurethat no
damage has occurredin handling.
eo Neutralizeexcess battery acid for disposal byadd-
ingitto2 gallons(7 litres) ofwaterinafive gallon(20
litres) plasticcontainer. Stirwithawoodenorplastic
paddlewhileaddingbakingsodauntilthe addition of
more soda causes no more foaming_.
In tt is recommendedthatthe batterybe charged be-
foreuse. Llsea 12 voltbatterycharger_Chargebat-
tery at a rate of 6 amperes for 1 hour. NOTE: OB-
SERVE SAFETY PRECAUTIONS, LISTED tNBOX
ABOVE, REQUIRED FOR BATTERY CHARGING.
Check the acid level after the battery is charged, if
the acid has fallen below the correct level,add dis-
tilledor ironfree water_
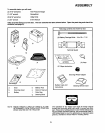
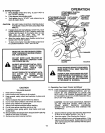
2. Unpack Tractor
ao Cutdown fourcomers of thecartonwithutilityknife
and fold down sides.
bo Disengage parkingbrake and position frontwheels
straightahead (see page 9),
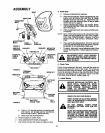
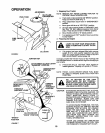
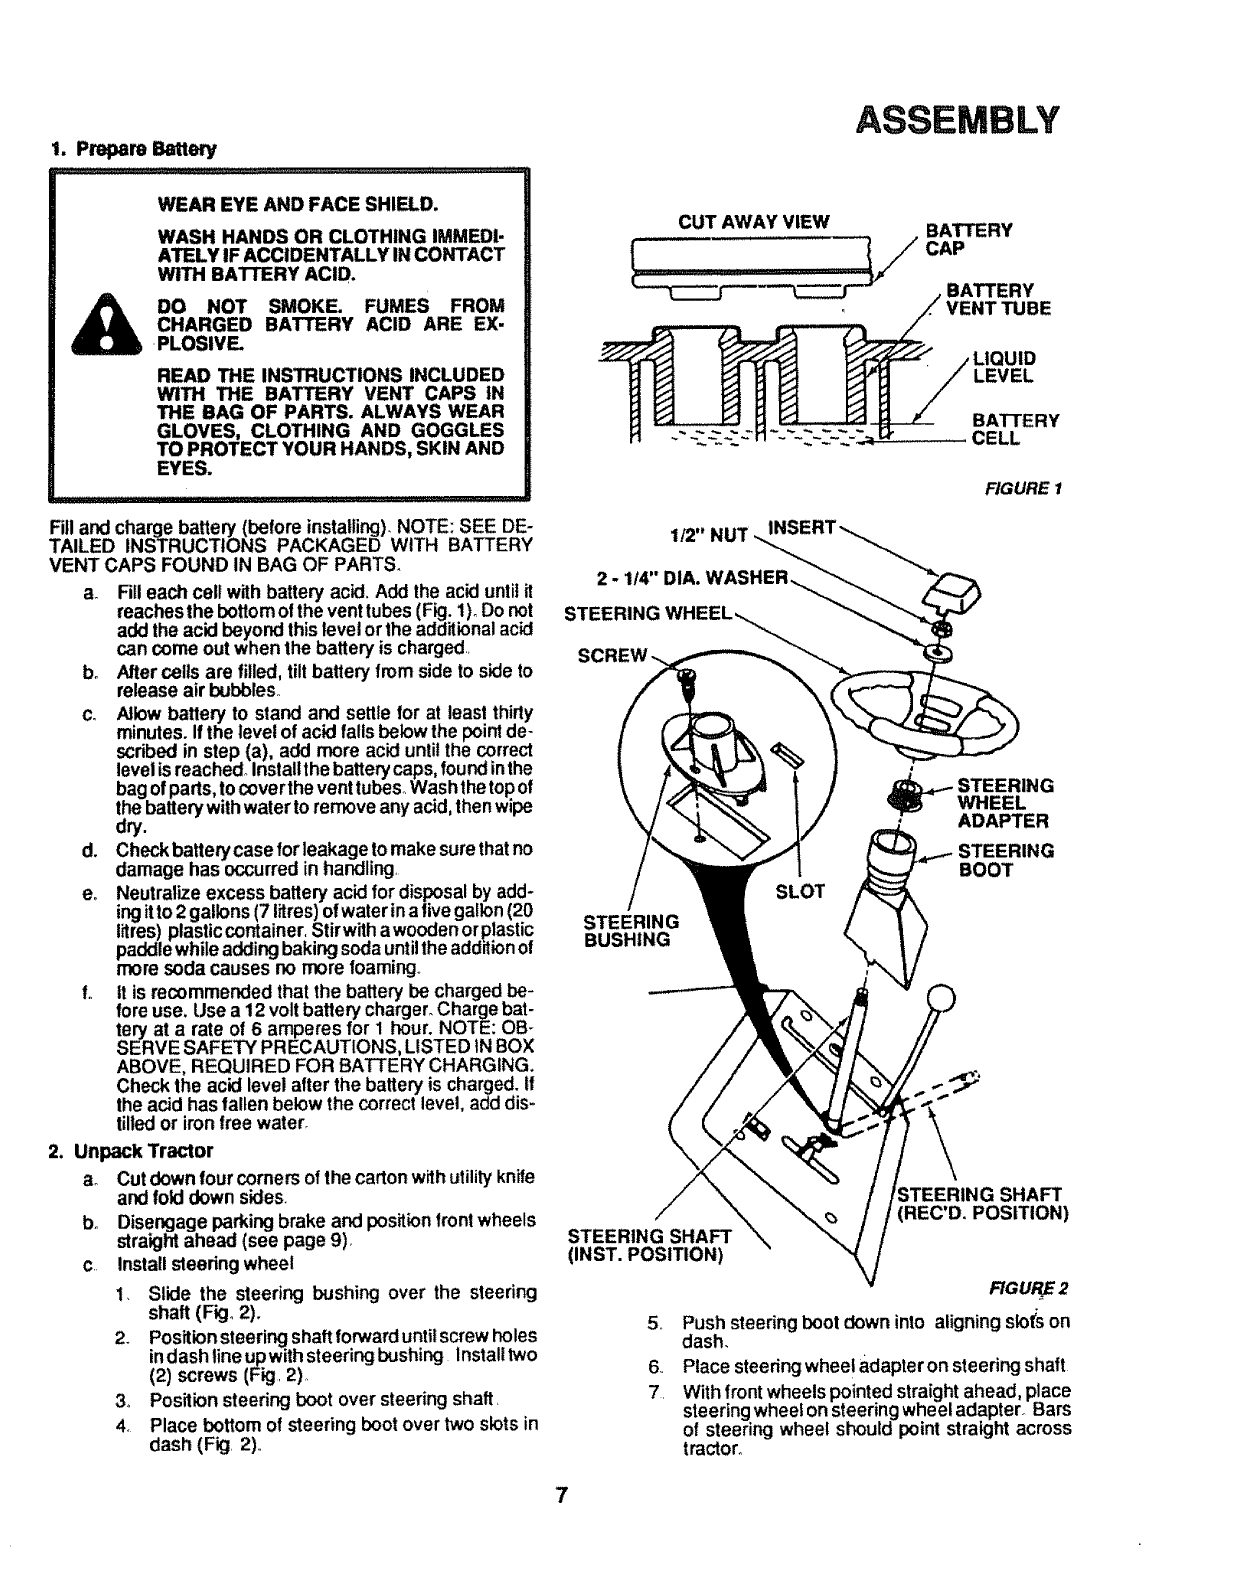
c Installsteering wheel
!_ Slide the steering bushing over the steering
shaft (Fig° 2).
2. Positionsteeringshaftforwarduntilscrew holes
indash lineupwithsteeringbushing install two
(2) screws (Fig, 2),
3, Positionsteeringboot over steeringshaft,
4_ Place bottom of steeringboot over two slots in
dash (Fig, 2),,
ASSEMBLY
CUT AWAY VIEW BATTERY
!.........
VENT TUBE
lid
LEVEL
BATTERY
CELL
I_"NUT
2.1/4"DIA.WASHER_
STEERING
SCREW_
FIGURE 1
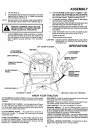
.,_STEERING
WHEEL
ADAPTER
STEERING
BOOT
STEERING
BUSHING
STEERING SHAFT
(REC'D. POSITION)
STEERING SHAFT
(INST. POSITION)
,,
7.
FIGU 2
Push steeringboot down into aligningsiot;son
dash.
Place steering whee! adapteron steering shaft
With frontwheels pointed straight ahead, place
steering wheel on steering wheel adapter.=Bars
of steering wheel should point straight across
tractor_
7