8
ASSEMBLY OF HOPPER BAG
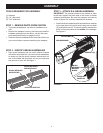
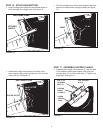
STEP 14 - ASSEMBLE TUBES
• Fittheendsofthetwoupperhoppertubesintothe
endsofarearhoppertube.Aligntheholesintheends
ofthetubesandsecuretheminplaceusingtwocurved
headbolts(G)andnylocknuts(H).Seegure11.
• Fittheendsofthetwolowerhoppertubesintothe
endsofarearhoppertube.Aligntheholesintheends
ofthetubesandsecuretheminplaceusingtwocurved
headbolts(G)andnylocknuts(H).Seegure11.
• Insertaclevispin(O)fromtheoutsideintoeachlower
hoppertubeandsecureitwithahaircotterpin(S).
Seegure11.
NOTE:Eithersideoftherearhoppertubecanfaceup.
FIGURE 11
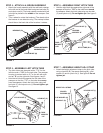
FIGURE 12
UPPER
HOPPER
TUBE
HOPPER
BAG
BOTTOM
STITCHED SLEEVE
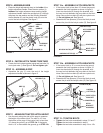
FIGURE 13
LOWER HOPPER TUBE
HOPPER BAG
BOTTOM
UPPER HOPPER
TUBE
CLEVIS PIN (N)
HAIR COTTER
PIN (S)
UPPER
HOPPER
TUBE
NYLOCK
NUT (H)
CURVED HEAD
BOLT (G)
REAR
HOPPER
TUBE
LOWER
HOPPER TUBE
REAR
HOPPER
TUBE
CLEVIS PIN (O)
HAIR COTTER PIN (S)
NYLOCK
NUT (H)
CURVED HEAD
BOLT (G)
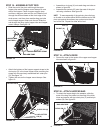
STEP 15 - ASSEMBLE TUBES TO BAG
• Unfoldthehopperbag,reversethefoldofthemesh
windscreenandthenlaythebagoutatwiththewind
screen on top.
• Inserttheendsoftheassembledupperhoppertubes
downthroughthestitchedsleevesinthesidesofthe
hopperbagandthenslidethetubesbackunderneath
thewindscreen.Seegure12.
• Placetheassembledlowerhoppertubesintothe
bottomofthehopperbagandthenslidethetubesto
thebackofthebag.Seegure13.
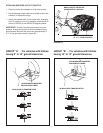
• Attachtheendsofthelowerhoppertubestothe
insideoftheupperhoppertubesusingtwoclevispins
(N)insertedfromtheinside,andtwohaircotterpins
(S).Seegure13.


