


5
ASSEMBLING THE GRASS BAG
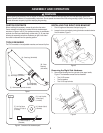
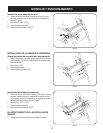
Place grass bag [A] over chute assembly [B], Figure 8.
Use the cable tie [I] to secure bag to chute assembly by inserting
the cable tie into hole in bag and pulling through. Make sure cable
is positioned so it ties bag around indented groove (over flange)
of chute, Figure 8. Pull cable tight with pliers.
1.
2.
ASSEMBLY AND OPERATION
ATTACHING THE ROD HANGER
Insert rod hanger [D] into the opening in the rod assembly [C],
Figure 9.
Slide the tabs on the grass bag over the bag hanger rod, Figure 9.
1.
2.
Figure 8
B
A
I
Figure 9
D
C
Tabs
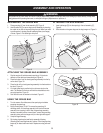
The operation of any lawn mower can result in foreign objects being thrown into the eyes, which can damage your eyes severely. Always wear
safety glasses while operating the mower, or while performing any adjustments or repairs on it.
WARNING
ATTACHING THE GRASS BAG ASSEMBLY
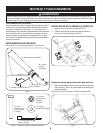
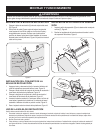
Shut the engine off and disconnect spark plug. Lift the chute
deflector on the deck back towards engine, Figure 10.
Place the bottom lip of the chute/grass bag assembly into the lip
on the deck, Figure 10.
Place the tab of the chute/grass bag assembly into the bracket on
the deck, Figure 10
Lift chute/grass bag to position hole in chute over stud on the
deck. The bracket on the chute will hold the chute deflector into
an upright position, Figure 10.
Push the latch over the bracket on the deck, Figure 10.
USING THE GRASS BAG
Turn the mower off and disconnect the spark plug wire before
emptying the grass bag.
Empty the bag when 3/4 full. To remove the grass bag, lift
discharge chute, lift chute/bag assembly from stud and remove
assembly from opening in deck. After the grass bag assembly
has been removed from the mower’s deck, remove the grass bag
assembly (along with the hanger rod) from the right side support.
Unzip the bag and empty.
Zip the bag closed and reinstall entire assembly following
“Attaching the Grass Bag Assembly” above. Check the grass bag
frequently for deterioration and wear. Replace worn bag with new
bag.
1.
2.
3.
4.
5.
1.
2.
3.
4.
Figure 10
1
3
2
4
5