


6
Fig. 2
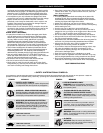
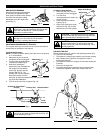
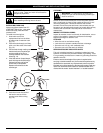
CONNECTING THE CORD
Use the cord hook when connecting the extension cord to the
power cord outlet. This helps prevent any disconnection.
1. Make a narrow loop with the extension cord.
2. Push the loop through the opening and move it onto the
hook on the motor housing (Fig. 4).
3. Plug the cord properly into the socket.
Only use outdoor-approved extension cords. Cord sets are
specified in the Important Safety Information section.
Fig. 4
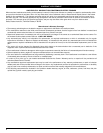
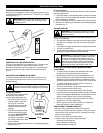
INSTALLING CUTTING ATTACHMENT SHIELD
1. Place the narrow end of the cutting attachment shield over the
shield bracket and position it so that the circular cut-out slips
over the guard assembly peg (Fig. 3).
2. Place the locking nut
into the hexagonal hole
on the left side of the
guard and hold in place.
3. Insert the assembly
screw into the hole on
the right side of the
guard and screw it
into the nut on the left
side using a Phillips-
head screwdriver.
4. Make sure the screw
is tight before
operating the unit.
Fig. 3
Guard
Assembly
Peg
Shield
Bracket
ASSEMBLY INSTRUCTIONS
Fig. 1
Bolt
Washer
Wing Nut
Tighten
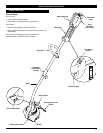
Shaft Grip
D-Handle
Minimum 6 inches
(15.24 cm)
Shaft
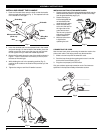
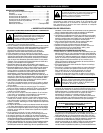
INSTALL AND ADJUST THE D-HANDLE
1. Push the D-handle down onto the shaft so that the handle
slants towards the shaft grip (Fig. 1). The squared bolt hole
in the handle is to the right.
2. Insert the shoulder bolt into the squared hole in the handle
and push through. On the left side of the handle, place the
washer on the bolt, then screw the wing nut onto the bolt.
Do not tighten until you make the handle adjustment.
3. Rotate the D-handle above the top of the shaft as shown in
Figure 1. Place it a minimum of 6 inches (15.24 cm) from
the base of the shaft grip.
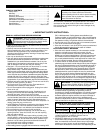
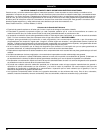
4. While holding the unit in the operating position (Fig. 2),
position the D-handle to the location that provides you the
best grip.
5. Tighten the wing nut until the D-handle is secure.