


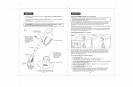

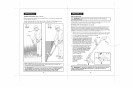


ADJUSTING THE HEIGHT
(Fig. 7 and 7a)
The Trimmer's TelescopicShaft Comes
in the Collapsed Position
1. To raise the telescopic shaft, pull
(separate) both the top and bottom
collars apart (see Fig. 7), and pull
(raise) the bottom section of the shaft
up to the desired height. It will click
into any one of the notches on the
shaft, and lock into place.
2. Release both collars to lock the shaft
into place (see Fig. 7a).
3. To lower or collapse the shaft simply
pull the bottom collar down
and lower the shaft.
Fig. 7 Fig. 7a
ADJUSTING THE CUTTING ANGLE (Fig. 8)
Your trimmer has a 4-position tilting head that easily adjusts to the desired working angle
for optimum operator control and comfort. To adjust the trimmer head angle:
1. Disconnect the trimmer from the power supply.
Z_ WARNING: Toavoid injury,
ALWAYS turn off and disconnect
the trimmer from the power outlet
BEFORE installing parts or
cleaning the trimmer or making
any adjustments.
2. Press the red trimmer head
adjustment button on the
motor housing (see Fig. 8).
3. Move the trimmer head to
one of four different angles
and release the button.
Head will click into position.
Easily readjust the angle
to a more comfortable
or efficient position
as needed.
Fig. 8
i _ WARNING: BEFORE connecting your trimmer to the power outlet,
BE SURE you are not pressing in on the trigger switch. Failure to do so could
result in accidental start-up, which may cause serious personal injury.
16
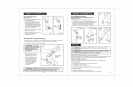
TO USETRIMMER FOR EDGING:
ROTATE REAR HANDLE AND UPPER SHAFT 180 °
(Figs. 9, 9a and 10)
1. Disconnect the trimmer from the power supply.
2. To rotate the top shaft 180°, pull (separate) both the top
and bottom collars apart (see Fig.9), and rotate the top
shaft with rear handle (and auxiliary handle) 180°.
Release both collars and shaft wilt lock in place.
3.Yourtrimmer isreadyfor use asan edger (See Figs.9a and 10).
Rotate
collars
to lock
sesI
Trlmme , '
m
.si }i F-
i ¸ ,
Fig. 10
Use as
Edger
Z_ WARNING: To avoid injury, DO NOT carry the trimmer with your finger
on the trigger switch.
Z_ WARNING: If any part of the trimmer is missing or damaged, do not plug
in the trimmer until the damaged part is repaired or replaced.
PIGTAIL POWER CORD (See Figs. 2, 2a and 2b on page 11)
Your edger trimmer has a 12-inch pigtail power cord. This cord must be attached to a proper
extension cord. Refer to page 11, Figs. 2, 2a and 2b for attaching extension cord.
TURNINGTRIMMER ON AND OFF
Your edger / trimmer has an extended length (4-finger) ON / OFF trigger switch.
Turning Trimmer ON
1. Plug the trimmer's pigtail power cord into extension cord.
2. Plug extension into power outlet.
3. Squeeze trigger switch to start trimmer.
4. The trimmer will stay ON as long as the trigger switch is squeezed.
Turning Trimmer OFF
1. Release the trigger switch to turn trimmer OFR
2. Allow at least 5 seconds for the cutting spool (line) to stop rotating.
17