


Customer First Center • 1121 Hwy 74 South • Peachtree City, GA 30269 IMI-575 AVU040300
Epic/Pole Mounted
Fixtures
Sheet 2 of 4
2/18/04 IMI-575
INSTALLATION INSTRUCTIONS
IMPORTANT: Read carefully before installing fixture. Retain for future reference.
TM
FIXTURE MAINTENANCE
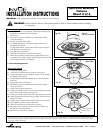
A. Relamping
Horizontally lamped
1. Loosen two door screws.
2. Lower door to tethered resting position. See Figure 4.
3. Install suitable lamp. Consult re-lamp label and lamp
instructions for details. Do not overtighten.
4. Raise door and secure with screws.
V
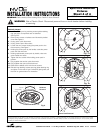
ertically lamped
1. Loosen and remove ring retaining screws globe retaining
ring and globe. Components are not tethered.
See Figure 5.
2. Install suitable lamp. Consult re-lamp label and lamp
instructions for details. Do not overtighten.
3. Reinstall ring retaining screws securing globe retaining ring
and globe. In the case of type 3 refractive glass globe, use
the mark on globe bottom for orientation.
B. Starter and Fuse Replacement (Where applicable)
Horizontall
y lamped
1. Loosen two door screws.
2. Lower door to tethered resting position. See Figure 4.
3. Loosen thumbscrew until rectangular washer can be rotated
90 degrees. See Figure 6.
4. Rotate reflector faceplate to release from screws using key
hole slots.
5. Unplug optic quick-disconnect.
6. Remove two screws on ballast cover followed by ballast
cover. See Figure 7.
7. For starter replacement, remove the plug-in starter from
receptacle and replace.
For fuse replacement, unscrew fuse holder cap and replace
fuse. Resecure fuse holder cap.
8. Resecure the ballast cover with the two screws.
9. Plug optic quick-disconnect and secure reflector by keyhole
slots and thumbscrew.
10. Raise door and secure with screws.
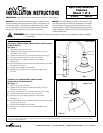
Aligning Socket
Fig. 2b
Aligning Pin
Classical Top
Fixture Screws
Teflon Washers
Fig. 3
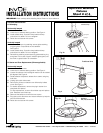
Arm Cap
Arm Cap
Arm Cap
Set Screws
Traditional Arm
Door Screws
Fig. 4a
Options
FG, FR, SG & FRS