


3
Call for customer service and/or missing or damaged parts (800-334-6871)
• Always use same wattage and type of bulb that was included with the fixture.
Failure to do so will void the warranty.
Putting up your fixture
Note: This fixture is intended to be conduit connected to a properly installed
and properly grounded metal weatherproof junction box (not provided). All
conduit connectors, conduit, and junction boxes (not provided) should be
cULus Listed suitable for wet location use.
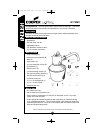
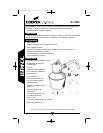
Step 1: Attach the two piece mounting brackets (I) to the extension arm (N) by
interlocking the bracket and securing with the 1/4-20 carriage bolt (L)
and 1/4-20 hex nut (M) provided. The mounting bracket should be
secure leaving approximately one inch of the extension arm protruding
out of the bottom of the bracket.
Note: The mounting bracket attaches to the end of the extension arm
that has notches cut into it.
Step 2: Place the extension arm assembly onto the desired mounting surface
and mark the four hole locations required for mounting. Remove the
arm assembly and drill the four marked locations for ease of mounting.
Step 3: Mount the extension arm assembly using the hex head lag screws (H)
provided. Tighten these screws securely before proceeding.
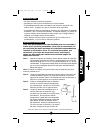
Step 4: Place the arm of the fixture onto the end of
the extension arm (O) and route the three
wires through the extension arm. Two hex
head bolts on the underside of the fixture
housing should be backed out enough to
slide the extension arm into the housing.
Slide access cover (G) between extension
arm and arm bracket. Be certain the
extension arm is fully seated into the arm
of the fixture. Tighten both arm screws to
hold the fixture in place.
Note: All three wires should be extending from the
bottom of the extension arm at this point.
Step 5: Fasten one piece lens assembly (B) to fixture housing (A) using (2)
lens assembly screws (E) and (2) washers (F).
Wiring your fixture
WARNING - RISK OF ELECTRIC SHOCK. Disconnect power at fuse or
circuit breaker before installing or servicing.
Step 1: Install the first conduit connector (not provided) into the conduit
connection cap (M).
Step 2: Feed supply wires from conduit through the connector and make wire
connections with wires extending from extension arm.
a. Attach the ground supply wire to the ground wire coming from
the fixture. Secure with wire nut (not provided).
O
N175MV_325-1511.qxd 11/1/05 2:24 PM Page 3