


7
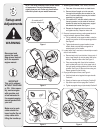
5. Insert post on cable tie into hole provided on the lower
handle. Pull cable tie tight and trim excess. See Figure
5.
3
Figure 8
1
2
3
Figure 6
B
A
Figure 7
A
C
B
Figure 5
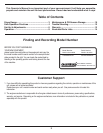
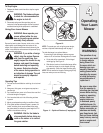
6.
Each wheel has a height adjustment lever to change
the cutting height of the mower. To change the height
of cut, squeeze adjuster lever toward the wheel,
moving up or down to selected height. See Figure 6.
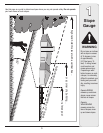
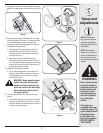
7. To assemble the grasscatcher:
a. Place bag over frame (black plastic side is the
bottom of bag.) Insert the hooks on the frame
through the holes in the side plastic channels of
the bag. See Figure 7.
b. Secure bag to frame by working the plastic
channels on bag over frame as shown in Figure 7.
All of the plastic channels except center top of bag
attach from the outside of bag. Center top of bag
attaches from the inside of bag.
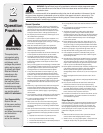
8. Attaching Grass Catcher to Mower
a. Lift the rear discharge door on the mower, and
place the grass catcher on the pivot rod. Let go
of discharge door so that it rests on the grass
catcher. See Figure 8.
WARNING: Never operate mower
unless the hooks on the grass
catcher are firmly seated on the
pivot rod, and the rear discharge
door rests firmly against top of
the grass catcher.
9. To remove grass catcher and utilize the mulching
feature:
a. Lift rear discharge door on the mower as shown in
Figure 8. Lift grass catcher up and out, off of the
pivot rod. Release rear discharge door to allow it to
close rear opening of mower.
NOTE: Make certain
bag is turned right side
out before assembling
(warning label will be on
the outside).
NOTE: Make certain
cables are routed to the
outside of the handle so
they are not in the way
when attaching the grass
catcher.
Never operate mower
unless the hooks on
the grass catcher are
firmly seated on the
pivot rod, and the
rear discharge door
rests firmly against
top of the grass
catcher.
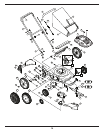
All mowers are
equipped with a rear
protective guard. The
guard helps eliminate
projectiles thrown
by the blade from
injuring the operator.
DO NOT REMOVE
THIS GUARD.
WARNING
Setup and
Adjustments