


25
L
L
a
a
t
t
i
i
t
t
u
u
d
d
e
e
S
S
c
c
a
a
l
l
e
e
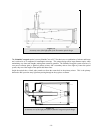
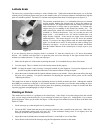
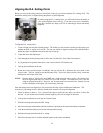
The easiest way to polar align a telescope is with a latitude scale. Unlike other methods that require you to find the
celestial pole by identifying certain stars near it, this method works off of a known constant to determine how high the
polar axis should be pointed. The Omni CG-4 mount can be adjusted from about 20 to 60 degrees (see figure 4-3).
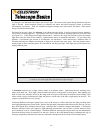
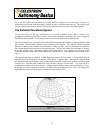
The constant, mentioned above, is a relationship between your latitude
and the angular distance the celestial pole is above the northern (or
southern) horizon. The angular distance from the northern horizon to the
north celestial pole is always equal to your latitude. To illustrate this,
imagine that you are standing on the North Pole, latitude +90°. The
north celestial pole, which has a declination of +90°, would be directly
overhead (i.e., 90 above the horizon). Now, let’s say that you move one
degree south — your latitude is now +89° and the celestial pole is no
longer directly overhead. It has moved one degree closer toward the
northern horizon. This means the pole is now 89° above the northern
horizon. If you move one degree further south, the same thing happens
again. You would have to travel 70 miles north or south to change your
latitude by one degree. As you can see from this example, the distance
from the northern horizon to the celestial pole is always equal to your
latitude.
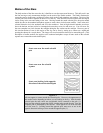
If you are observing from Los Angeles, which is at latitude 34°, then the celestial pole is 34° above the northern
horizon. All a latitude scale does then is to point the polar axis of the telescope at the right elevation above the
northern (or southern) horizon. To align your telescope:
1. Make sure the polar axis of the mount is pointing due north. Use a landmark that you know faces north.
2. Level the tripod. There is a bubble level built into the mount for this purpose.
NOTE: Leveling the tripod is only necessary if using this method of polar alignment. Perfect polar alignment is still
possible using other methods described later in this manual without leveling the tripod.
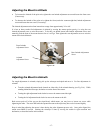
3. Adjust the mount in altitude until the latitude indicator points to your latitude. Moving the mount affects the angle
the polar axis is pointing. For specific information on adjusting the equatorial mount, please see the section
“Adjusting the Mount.”
This method can be done in daylight, thus eliminating the need to fumble around in the dark. Although this method
does NOT put you directly on the pole, it will limit the number of corrections you will make when tracking an object.
It will also be accurate enough for short exposure prime focus planetary photography (a couple of seconds) and short
exposure piggyback astrophotography (a couple of minutes).
P
P
o
o
i
i
n
n
t
t
i
i
n
n
g
g
a
a
t
t
P
P
o
o
l
l
a
a
r
r
i
i
s
s
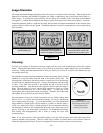
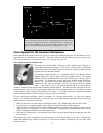
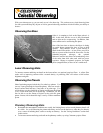
This method utilizes Polaris as a guidepost to the celestial pole. Since Polaris is less than a degree from the celestial
pole, you can simply point the polar axis of your telescope at Polaris (see Figure 4-4). Although this is by no means
perfect alignment, it does get you within one degree. Unlike the previous method, this must be done in the dark when
Polaris is visible.
1. Set the telescope up so that the polar axis is pointing north.
2. Loosen the DEC clutch knob and move the telescope so that the tube is parallel to the polar axis. When this is
done, the declination setting circle will read +90°. If the declination setting circle is not aligned, move the
telescope so that the tube is parallel to the polar axis.
3. Adjust the mount in altitude and/or azimuth until Polaris is in the field of view of the finder.
4. Center Polaris in the field of the telescope using the fine adjustment controls on the mount.
Figure 4
-
3