


38
2. Then accurately center the star in your eyepiece and press ALIGN.
The telescope will then "sync" on this star and slew to the position that star should be if it were accurately polar
aligned.
3. Use the mounts latitude and azimuth adjustments (see figure 2-15) to place the star in the center of the
eyepiece
. Do not use the direction buttons on the hand control to position the star. Once the star is
centered in the eyepiece, press ENTER; the polar axis should now be pointed towards the North Celestial
Pole.
Updating your Star Alignment
After polar alignment it's a good idea to check the pointing accuracy of the telescope to see how much it may have been
affected by moving the mount. Since the polar alignment process requires you to "sync" the telescope on a bright star
before you begin, it will be necessary to undo the sync before re-aligning. To undo the sync:
1. Press the
Align button and use the Up/Down buttons on the hand controller to select Undo Sync from the list, and
press
Enter. The message Complete will display on the LCD.
To re-align your telescope:
2. Slew the telescope to one of the original alignment stars, or another bright star if the original alignment stars are no
longer in a convenient location. Press the
Align button and use the Up/Down buttons on the hand controller to
select
Alignment Stars from the list.
3. The hand control LCD will ask you which of the original alignment stars you wish to replace. Use the Up/Down
buttons to select the desired star and press
Enter.
4. Once again center the star in the finderscope and press Enter.
5. Then center the star in the eyepiece and Press Align.
6. Repeat the process on a second alignment star.
For additional all sky pointing accuracy, it’s a good idea to align on at least one additional calibration stat located on the
opposite side of the Meridian. To add calibration stars:
1. Slew the telescope to a bright star on the opposite of the Meridian from your two alignment stars.
2. Press the
Align button and use the Up/Down buttons on the hand controller to select Calib. Stars from the list, and
press
Enter.
3. Align the star in the finderscope and then the eyepiece as you did with the alignment stars.
Display Align – the user can now display the polar alignment error in the RA and DEC axes. These values show how
close the mount is pointed at the celestial pole base on how accurately the user centered the alignment star with the
hand control and with the mount adjustment. To display the alignment error:
1. Press the
Align button and use the Up/Down buttons on the hand controller to select Display Align from the list,
and press
Enter.
Tip for polar aligning your telescope using the Hand Control
For best results choose a polar alignment star that is high in the sky and near the Meridian. Try to avoid stars that are
close to the west/east horizon, directly overhead or too near the celestial pole.
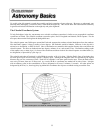
Pointing at Polaris
This method of Polar aligning utilizes Polaris as a guidepost to the celestial pole. Since Polaris is less than a degree from
the celestial pole, you can simply point the polar axis of your telescope at Polaris. Although this is by no means perfect
alignment, it does get you within one degree and is suitable for visual observing and short exposure piggyback