


11
Installing the Eyepieces
The eyepiece, or ocular as it is also called, is an optical element that magnifies the image focused by the telescope.
Without the eyepiece it would be impossible to use the telescope visually. The eyepiece fits directly into the focuser.
To attach an ocular:
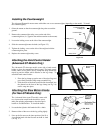
1. Loosen the set screw on the eyepiece adapter so that
it does not obstruct the inner diameter of the barrel.
2. Slide the chrome portion of the eyepiece into the
focuser.
3. Tighten the set screw to hold the eyepiece in place.
To remove the eyepiece, loosen the set screw on the
focuser and slide the eyepiece out. You can replace
it with another ocular.
Eyepieces are commonly referred to by focal length and barrel diameter. The focal length of each eyepiece is
printed on the eyepiece barrel. The longer the focal length (i.e., the larger the number) the lower the eyepiece
magnification (i.e., power) and the shorter the focal length (i.e., the smaller the number) the higher the
magnification. Generally, you will use low-to-moderate power when viewing. For more information on how to
determine power, see the section on “Calculating Magnification.”
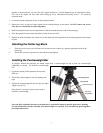
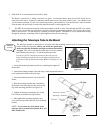
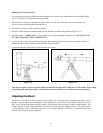
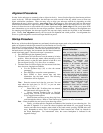
Your telescope can use eyepieces with both a 1-1/4" barrel diameter and 2" barrel diameter. To use a 2" barrel
eyepiece, the 1 1/4" eyepiece adapter must first be removed. To do this, simply loosen the two chrome thumbscrews
located around the focuser barrel (see figure 2-11) and remove the 1 1/4" adapter. Once removed, a 2" eyepiece or
accessory can be inserted directly into the focuser barrel and secured with the two thumb screws.
B
B
a
a
l
l
a
a
n
n
c
c
i
i
n
n
g
g
t
t
h
h
e
e
T
T
u
u
b
b
e
e
i
i
n
n
R
R
.
.
A
A
.
.
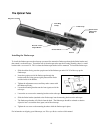
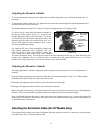
To eliminate undue stress on the mount, the telescope should be properly balanced around the polar axis. In
addition, proper balancing is crucial for accurate tracking if using an optional motor drive. To balance the mount:
1. Release the R.A. Clamp (see figure 2-15) and position the telescope off to one side of the mount (make sure that the
mounting bracket screw is tight). The counterweight bar will extend horizontally on the opposite side of the mount
(see figure 2-12).
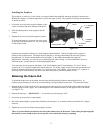
2. Release the telescope — GRADUALLY — to see which way the telescope “rolls.”
3. Loosen the set screw on the counterweight.
4. Move the counterweight to a point where it balances the telescope (i.e., it remains stationary when the R.A. clamp is
released).
5. Tighten the set screw to hold the counterweight(s) in place.
These are general balance instructions and will reduce undue stress on the mount. When taking astrophotographs,
this balance process should be done for the specific area at which the telescope is pointing.
Fi
g
ure 2-11
Focuser Tension
Screw
Focuser Knob
2" Focuser
Barrel
1 ¼" Eyepiece
Adapter
T-Adapter
Thread