


13
Caldwell – A combination of the best NGC and IC objects.
Planets - All 8 planets in our Solar System plus the Moon.
Stars – A compiled list of the brightest stars from the SAO catalog.
List – For quick access, all of the best and most popular objects in the NexStar database have been broken
down into lists based on their type and/or common name:
Named Stars
Common name listing of the brightest stars in the sky.
Named Objects
Alphabetical listing of over 50 of the most popular deep
sky objects.
Double Stars
Numeric-alphabetical listing of the most visually stunning
double, triple and quadruple stars in the sky.
Variable Stars
Select list of the brightest variable stars with the shortest
period of changing magnitude.
Asterisms
A unique list of some of the most recognizable star
patterns in the sky.
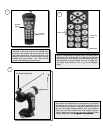
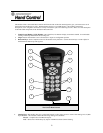
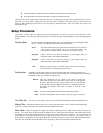
5. Info: Displays coordinates and useful information about objects selected from the NexStar database.
6. Tour: Activates the tour mode, which seeks out all the best objects for a given month and automatically slews the
NexStar to those objects.
7. Enter: Pressing Enter allows you to select any of the NexStar functions, accept entered parameters and slew the
telescope to displayed objects.
8. Undo: Undo will take you out of the current menu and display the previous level of the menu path. Press Undo
repeatedly to get back to a main menu or use it to erase data entered by mistake.
9. Menu: Displays the many setup and utilities functions such as tracking rate and user defined objects and many
others.
10. Scroll Keys: Used to scroll up and down within any of the menu lists. A double arrow symbol on the right side of
the LCD indicates that the scroll keys can be used to view additional information.
11. Rate: Instantly changes the rate of speed of the motors when the direction buttons are pressed.
12. RS-232 Jack: Allows you to interface with a computer and control the NexStar remotely.
H
H
a
a
n
n
d
d
C
C
o
o
n
n
t
t
r
r
o
o
l
l
O
O
p
p
e
e
r
r
a
a
t
t
i
i
o
o
n
n
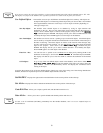
This section describes the basic hand control procedures needed to operate the NexStar. These procedures are grouped into
three categories: Alignment, Setup and Utilities. The alignment section deals with the initial telescope alignment as well as
finding objects in the sky; the setup section discusses changing parameters such as tracking mode and tracking rate; finally,
the last section reviews all of the utility functions such as adjusting the telescopes slew limits and backlash compensation.
Alignment Procedure
In order for the NexStar to accurately point to objects in the sky, it must first be aligned with two known positions (stars) in
the sky. With this information, the telescope can create a model of the sky, which it uses to locate any object with known
coordinates.
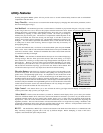
Auto-Align
Auto-Align is the easiest way to get your NexStar aligned and ready to observe. Even if you do not know a single star in the
sky, the NexStar will align itself by guiding the user through the alignment procedure by asking for basic information like
the date, time and location. The NexStar will then automatically choose two stars for alignment and roughly center the stars
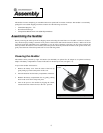
in the field of view of the Star Pointer. Before the telescope is ready to be aligned, it should be set up in an outside location
with all accessories (eyepiece and Star Pointer) attached and lens cover removed as described in the Assembly section of the
manual.
1. Once the NexStar is powered on the display will read NexStar Ready.Press ENTER to begin alignment.
The first time that the NexStar is used, it will request information to help identify the model of telescope. Once powered on,
the hand control will display the message Select Model
Select ModelSelect Model
Select Model. Use the Up and Down menu keys (10) to scroll through the
different NexStar models. Press ENTER when your NexStar model is displayed on the hand control. This information will
be retained for future use and will not be displayed again. If for some reason the incorrect model was selected or you wish