


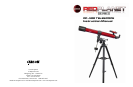
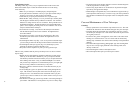
Key to Figures 1-7:
1. ObjectiveLens
2. LensShade
3. Optical Tube Assembly
4. CradleRing
5. 6x30mmFinderScope
6. Focus Knobs
7. EquatorialMount
8. R.A.FlexibleCable
9. Counter Weight Bar
10. EquatorialMountBase
11. TripodLegs
12. Counter Weight
13. CounterWeightLockingScrew
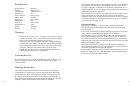
14. Eyepiece
15. 90°CornerLens
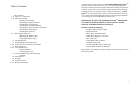
16. OpticalTubeSaddlePlate
17. Dec.FlexibleCable
18. LatitudeTurnScrews
19. SaddlePlateLockKnob
20. Dec.SettingCircle
21. R.A.SettingCircle
22. R.A.LockKnob
23. LatitudeDial
24. Dec.LockKnob
25. EquatorialMountLockingScrew
26. FinderScopeBracketThumbScrews
27. FinderScopeFocusKnob
28. FinderScopeBracket
29. FinderScopeBracketMountingBolts
30. FocuserDrawTube
31. EyepieceHolderThumbScrew
32. 90°CornerLensThumbScrew
33. CradleRingLockKnob
34. Accessory Tray
35. EyepieceHolderSlots
36. TripodBraces
37. TripodLegExtensionLockKnob
AssemblyofyourRedPlanetTelescope:
Setting Up Your Tripod:
Thealuminumtripodcomesalmostentirelypreassembledandready-to-use.
Removethetripodfromtheboxandpullapartthelegs.Gentlypushdown
thetripodbraces(Fig.7-36)untiltheyareinthelowestposition.Youcan
thenextendthelegstothedesiredheightbylooseningtheslidinglegexten-
sionlockknob(Fig.7-37),slidingthelegdownthedesiredamountandthen
tighteningtheextensionlockknobuntilsecure.Repeattheprocesswitheach
legtryingtokeepthetripodaslevelaspossiblewiththeground.Youcan
thenattachtheaccessorytray(Fig.7-34)tothetripodbyliningupthethread-
edbottomoftheaccessorytraywiththeholeinthemiddleofthethreetripod
bracesandtwistinguntiltight.Thistrayisdesignedwitheyepieceholder
slots(Fig.7-35)toholdspareeyepieceswhennotinuse.
Attaching the Equatorial Mount:
Removetheequatorialmount(Fig.1-7)fromtheboxandtwistintotheposi-
tionshowninFig.3.Placethebottomofthemount(Fig.1-10)intothehole
inthetopofthetripodheadandsecurewiththemountlockingscrew(Fig.
3-25).Pleasebecarefultomakesurethatthemountissecurelyattachedto
thetripod.
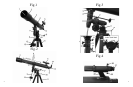
Attaching the Counterweight:
Attachthethreadedendofthecounterweightbar(Fig.1-9)intothethreaded
holeintheequatorialmount(Fig.1-7).Removethesafetyscrewandwasher
fromtheendofthecounterweightbarandsetasideforamoment.Slidethe
counterweight(Fig.1-12)ontothebarandtightendownusingthescrewon
thesideofthecounterweight(Fig.1-13).Becarefulnottodropthecoun-
terweight.Itisquiteheavyandcouldharmyouordamageyouroorif
dropped.Donotworryaboutthepositionofthecounterweightjustyet.We
willpositionitproperlylater.Replacethesafetyscrewandwasherattheend
of the counterweight bar.
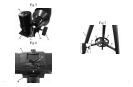
Attaching the Slow Motion Cables:
Locatethetwoslowmotioncables(Fig.2-8,17).Loosenthescrewattheend
ofeachcablesothatitdoesnotprotrudethroughthehole.Slideonecable
ontotheleftsideoftheR.A.shaft(Fig.1-8)(locatednearthebottomofthe
mount)andtightendownwiththelockingscrew.Slidetheremainingcable
ontotheDec.shaft(Fig.2-17)(locatednearthetopofthemount)andtighten
downwiththelockingscrew.Theseslowmotioncableswillallowyouto
makenepointingadjustmentstothetelescopeinbothR.A.anddeclination.
Thiswillbediscussedinmoredetaillater.
98