


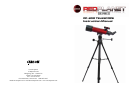
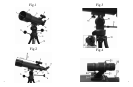
AssemblyofyourRedPlanetTelescope:
Setting Up Your Tripod:
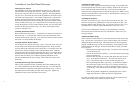
Thealuminumtripodcomespreassembledandready-to-use.Removethe
tripodfromtheboxandpullapartthelegs.Gentlypushdownthetripod
braces(Fig.6-28)untiltheyareinthelowestposition.Turnthetightening
ring(Fig.6-27)(locatedatthecenteroftheTripodBrace)clockwisetolock
thetripodintheopenposition.Youcanthenextendthelegstothedesired
heightbypullingopenthetaboneachleglock(Fig.6-32),slidingtheleg
downthedesiredamountandthenpushingtheleglockbackagainsttheleg
intothelockedposition(Fig.6-31).Repeattheprocesswitheachlegtrying
tokeepthetripodaslevelaspossiblewiththeground.Youwillnoticethere
areholesinthetripodlegbraces(Fig.6-29).Thesearedesignedtohold
eyepieces when not in use.
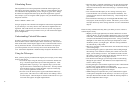
Attaching the Horizon Mount:
Removethehorizonmount(Fig.1-10)fromtheboxandplacethebottomof
themount(Fig.1-11)intotheholeinthetopofthetripodheadandsecure
withthemountlockingscrew(Fig.3-19).Pleasebecarefultomakesurethat
themountissecurelyattachedtothetripod.
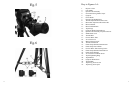
Attaching the Slow Motion Cables:
Locatethetwoslowmotioncables(Fig.1-8,9).Loosenthescrewattheend
ofeachcablesothatitdoesnotprotrudethroughthehole.Slideonecable
ontotheshaftonthesideofthehorizonmount(Fig.1-9)(locatedclosestthe
bottomofthemount)andtightendownwiththelockingscrew.Slidethe
remainingcableontothealtitudeadjustmentshaft(Fig.1-8)(locatednearthe
middleofthemount)andtightendownwiththelockingscrew.Theseslow
motioncableswillallowyoutomakenepointingadjustmentstothe
telescopebothhorizontallyandvertically.Thiswillbediscussedinmore
detaillater.
Attaching the Telescope Tube to the Mount:
Thetopoftheequatorialmountiscalledtheopticaltubesaddleplate(Fig.
1-7).Pullandholddownonthesaddleplatelock(Fig.2-15)andslidethe
bracketattachedtothebottomoftheopticaltubeassembly(Fig.2-14)into
thesaddleplateuntilthesaddleplatelockclicksintoplace.Tightenthe
saddleplatelocktosecuretheopticaltubeinplace.
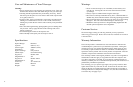
Attaching the Finder Scope:
Therearetwonderscopebracketmountingbolts(Fig.4-24)locatedatthe
endoftheopticaltubeneartheeyepieceassembly.Removethenutsandset
aside.Placethenderscopebracket(Fig.4-25)ontothemountingbolts,
replacethenutsandtightendownsecurelytotheopticaltube.Makesurethe
bracketisfacingforwardasshowninFig.4.Slidethenderscope(Fig.1-4)
intothebracketfacingforward.
Attaching the Eyepieces:
Insertthe45°cornerlens(Fig.2-18)intothefocuserdrawtube(Fig.2-17)
andsecureintoplacebytighteningthecornerlensthumbscrew(Fig.5-26).
InserttheKellner20mmeyepiece(Fig.2-5)intothecornerlens(Fig.2-18)
andtightendownusingtheeyepieceholderthumbscrew(Fig.2-13).
YouhavenowcompletedtheassemblyofyourRedPlanet
TM
telescope.
Wewillnowneedtomakethenecessaryadjustmentsinordertouseyour
telescope properly.
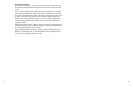
Aligning the Finder Scope:
Thelowpowerandwideeldofviewprovidedbythe8x21mmnderscope
(Fig.1-4)providesaquickandeasywaytosightanobjectpriortolooking
throughthehigh-powertelescope.Thenderscopemustrstbeproperly
alignedwiththetelescopeinordertoworkproperly.Thisalignmentisbest
performedduringthedaylight.Followthestepsbelowtoalignyournder
scope properly:
•PlacetheKellner20mmeyepiece(Fig.2-5)intothecornerlens(Fig.
2-18)ofthetelescope.
•Loosenthealtitudelockknob(Fig.3-20)sothatthetelescopeswings
freely along both axes.
•Pointthemaintelescopeataspeciclandobject200yardsormore
away.Lockdownthealtitudeaxis.Turntheslowmotioncables
(Fig.1–8,9)untiltheobjectiscenteredinthetelescopeeld.
•Nowlookthroughthenderscope(Fig.1-4)andloosenortighten
thenderscopebracketscrews(Fig.4-21)untilthecrosshairsare
centeredonthesameobject.Focusbyturningthenderscopefo-
cusknob(Fig.4-22)untiltheimageinthenderscopeissharpand
clear.
•Checkthealignmentatnighttimebyrepeatingthisprocesswitha
brightstarorthemoon.Makeanynecessaryadjustments.
Nowthatyournderscopeisproperlyaligned,anyobjectcenteredinyour
nderscopeshouldalsobecenteredinyourtelescope.
98