


Once applied to a cleaning surface, detergents take time to
break down dirt and grime. Detergents work best when applied
at low pressure.
You can effectively clean surfaces by combining the chemical
action of detergents with high pressure rinses. On vertical
surfaces, apply the detergent starting at the bottom and work
your way upward. This method prevents the detergent from
sliding down and causing streaks. Begin high pressure rinsing at
the bottom and work your way upward. On particularly tough
stains, use a brush in combination with detergents and high
pressure rinsing.
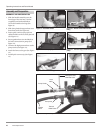
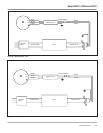
1. Follow manufacturer’s label directions for mixing correct
concentrations of soap/detergents. The soap detergent to
water ration through the pump is approximately 10% (1 to
10).
2. Insert the filter end of the clear plastic detergent tube into
the detergent container.
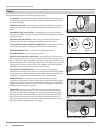
3. Use the black 65° quick connect spray tip.
4. Adjust the detergent injection flow by turning the collar of
the injector. Turning collar clockwise increases detergent
flow.
General Cleaning Tips
1. Apply the detergent so that it thoroughly covers the cleaning
surface. Apply the detergent from bottom to top to prevent
the detergent from sliding down and streaking. Wait a
couple of minutes for the detergent to break down the dirt
and grime. Use a brush to lightly scrub heavily soiled areas.
Never allow the detergent to dry on the cleaning surface.
2. To rinse: replace black 65° spray tip with another color tip.
Never replace quick connect tip when gun
is triggered. Always engage trigger lock on gun
before removing or installing quick connect tips.
3. After using detergents, flush the suction system by placing
the detergent suction tube into a bucket of clean water and
spraying with the black spray tip.
CLEANING POWER
The easiest way to regulate the cleaning power of your pressure
washer is by changing the distance from the surface you are
cleaning. Begin spraying with a wide fan pattern while standing
several feet from the surface. Slowly move closer to the object
you are cleaning, adjusting the spray pattern as necessary, until
you find the most effective cleaning technique.
NOTE: The unit may have also a pressure adjustment knob on
the pump that can adjust the pressure.
FINAL RINSE
The final rinse should start at the bottom and work upward.
Make sure that you thoroughly rinse the surface and that you
remove all detergent.
13
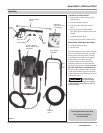
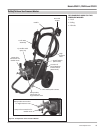
Models CP5211, CP5216 and CP5321
www.chpower.com
Operation (Continued)
PRESSURE RELIEF PROCEDURE
To reduce the risk of bodily injury or property damage, always
follow this procedure whenever spraying is stopped, when work
is completed, and before checking or repairing any part of the
system.
1. Engage the trigger safety latch.
2. Turn the unit off.
3. Shut off the water supply.
4. Disengage the trigger safety latch and trigger the gun to
relieve pressure.
5. Re-engage the trigger safety latch.
6. When checking or repairing unit, remove the wall outlet plug
from the wall.
7. Before overnight storage, long term storage, or transporting
unit, disconnect the water supply.
SHUTDOWN
1. Be sure all detergent is flushed from system.
2. Turn the motor OFF.
3 Turn the water supply OFF.
4. After the motor and water supply are turned off, trigger the
gun to depressurize the system.
NEVER turn the water supply off before turning
the engine/motor off. Serious damage could
occur to the pump and/or engine/motor.
NEVER disconnect the high pressure discharge
hose from the machine while the system is
pressurized. To depressurize, turn engine/motor off, turn water supply
off and squeeze gun trigger 2-3 times.
5. After each use, wipe all surfaces of the pressure washer with a
clean, damp cloth.
STORAGE
• Donotstorethepressurewasheroutdoors.
• Donotstorethepressurewasherwhereitmightfreezeunless
it has been properly winterized.
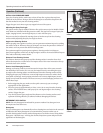
Winterizing Instructions
1. Disconnect the high pressure hose from the pump.
2. Insert a 12 inch to 14 inch piece of garden hose into the
pump inlet.
3. Place a funnel in the other end of the garden hose.
Read the manufacturer’s instructions for safe
handling and disposal of RV antifreeze.
4. Pour approximately 6 oz. of RV antifreeze into the funnel.
5. Jog the On/Off Switch briefly until the RV antifreeze comes
out of the pump outlet.