


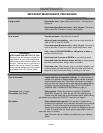


1. Trip all GFCI breakers in sub-panel, or
main electrical panel.
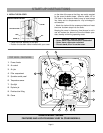
2. Remove the equipment compartment
access door.
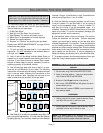
3. Locate the end of the drain hose and lift
it above the water level. (Requires clipping plastic tie the
first time.)
4. Unscrew and remove the drain cap.
5. Attach drain hose to a garden hose and
direct to an appropriate draining area,
keeping the hose below the water line.
6.
After your spa is empty, clean the
shell and filter cartridge. See “IMPOR-
TANT MAINTENANCE PROCEDURES”
on page 10.
7. After cleaning, remove garden hose,
replace drain cap and put drain hose back
in equipment compartment.
8. Follow the “START-UP INSTRUCTIONS”
on page 5 to refill your spa.
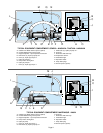
5. Follow the instructions on page 12 to remove the float-
ing weir, basket and filter cartridge. Insert a shop vacuum
hose into the suction line located in the bottom of the filter
compartment (operate in the blow mode). If the vacuum
hose does not fit tight into the opening, air will escape. It
might be necessary to wrap a rag around the vacuum
hose to make an air-tight seal.
6. With the vacuum blowing into the opening of the filter
compartment, note that air escapes through one of the
suction openings in the footwell. Close this suction open-
ing by installing a 1 1/2” NPT “freeze plug” (available from
a hardware store). Position all Power Diverters to
“Combo” and operate the shop vacuum in blow mode to
blow all of the water out of the jet lines supplied by the
dual-speed pump.
7. Note that there are two other suction openings in the
sides of the footwell. Remove the freeze plug used in the
previous step and install it in one of these openings.
Insert the vacuum hose into the other suction opening and
blow the water out of the jet lines supplied by the single-
speed pump.
8. Remove the freeze plug, replace the suction covers and
reinstall the screws to secure the suction covers.
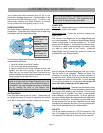
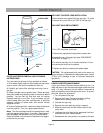
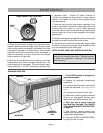
9. Use a wrench to remove the pump drain plugs located
on the front of the pump housings. Allow all water to drain
out, then replace the pump drain plugs.
NOTE: DO NOT LEAVE ANY WATER IN YOUR SPA.
WARNING: When not in use, the spa must be cov-
ered with an insulating spa cover. Damage caused
by either sun exposure or freezing is not covered
under warranty.
Page 14
DRAINING YOUR SPA
MAINTENANCE
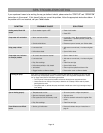
Front view of pump
DRAIN
PLUG
PUMP DRAIN PLUG LOCATION
DRAIN CAP
DRAIN
HOSE
GARDEN HOSE
EQUIPMENT
COMPARTMENT
DOOR