


8
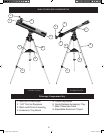
1. Set up your assembled telescope on a stable level surface. Your back yard is preferred to your back deck.
2. Turn on both illuminated dial switches to light your telescope mount.
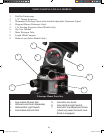
3. Refer to the direction indicated by "0" on the included compass to align your telescope properly. To orient
your telescope to the same "0" reference, follow these steps (refer to the "Telescope Mount Parts Key" on
the parts illustration page) :
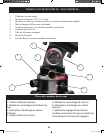
a. Find the black arrow index mark, located just below the azimuth dial on the mount.
b. Move the tripod (or entire telescope) until this arrow index mark is aimed in the direction indicated
by "0" on the compass.
c. Loosen the azimuth lock knob and rotate the telescope tube until it is lined up in the same
direction as the arrow index mark (and "0" on the compass). On refractor style telescopes, the large
objective lens should be pointed in the same direction as the arrow index mark. On reector style
telescopes, the "open" end of the telescope tube should be pointed in this direction.
d. Finally, with the azimuth lock knob still loosened, rotate the illuminated azimuth dial so that "0" on
the dial is lined up with the arrow index mark, telescope tube, and "0" compass heading.
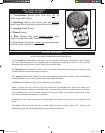
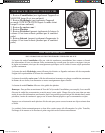
4. Power on your Sky Tour Handset by pressing and holding the “Constellation Button”.
a. If this is your rst time setting up, the handset will prompt you to set your date, time, location
information. Once this is set up, your Sky Tour handset will retain that information until the
batteries are replaced. To nd your latitude and longitude, please check a map of your area or log
on to the Bushnell website for assistance (www.bushnell.com).
b. Once your Sky Tour Handset is set for your location and time, the handset will automatically tell
you your local time and what objects are available for you to tour that evening.
5. Choose your desired mode of operation by pressing the corresponding button: Constellations, Mythology,
Amazing Facts, or Planets.
6. The Sky Tour handset will then tell you an altitude number (this corresponds to the top dial) and an
azi muth number (this corresponds to the bottom dial) for the tour object of choice.
7. Don’t worry if you miss the numbers, you can repeat them by pressing the back button.
8. Move the telescope in altitude and azimuth to the corresponding numbers on the dials and the telescope
will be pointed at your tour object!
9. Continue pressing the next button to hear more information for that mode until the facts are starting to
repeat, then select a different mode.
10. You don’t have to listen to all items in each mode, you can jump from mode to mode if you choose.
11. Each time you choose a new mode, directions are given for the rst object in each mode. Simply move
your telescope to view them and enjoy the information as it is spoken.
12. The planets mode is a unique mode that allows you to hear basic information about the ve brightest
planets and the moon.
13. Once you’ve nished the tour of each mode, you can advance to the next tour object by pressing the mode
you desire a second time. This will advance the handset to the next item in the tour.
14. If desired, your telescope and handset may also be used independently.
INITIAL SETUP AND BASIC OPERATION
Voyager Sky Tour 6LIM.indd 8 10/22/06 7:38:02 PM